This guide shows you how to install an operating system on a VPS by hand in SolusVM: mounting an installation ISO to the server's virtual CD-ROM drive, telling the virtual machine to boot from it, and then driving the installer yourself through the VNC console. SolusVM is a virtualisation management panel that gives VPS customers direct control over their own virtual machines, including the virtual hardware settings this procedure depends on. People describe this task in several ways: a manual OS install, a custom install, installing from ISO, mounting a CD-ROM image, or a clean reinstall with custom partitions. They all mean the same thing, and this is the procedure.
The reason to do it this way rather than using the panel's automated reinstaller is control. The automated reinstaller lays a prepared template onto the disk with a partition layout the template author chose. A manual install puts the operating system's own installer in front of you, so you decide the partitioning, the filesystem, the packages and the settings. That control is the whole point, and it is also the whole cost: nothing is done for you, and every mistake is yours to make.
Last reviewed: 27 July 2026, against the current SolusVM release. This guide is published by Noiz and is kept current against SolusVM. It complements, and does not replace, the official SolusVM documentation linked below. SolusVM's client interface has been reworked between major versions, so a control may be worded or positioned differently in your copy; the sequence and the underlying behaviour described here hold across releases.
Official Documentation Reference
- SolusVM Documentation (home): the vendor's documentation hub. If a control in your panel is worded differently from the one described here, search this site for the current wording.
- Quick Start Guide: Customers (SolusVM): the vendor's walkthrough of the customer side of the panel, including the ways you can connect to a server once it is running.
- Recovering Inaccessible Servers with Rescue Mode (SolusVM): worth reading before you start. If a manual install leaves the server unbootable, rescue mode is the path back in, and it is the route your provider would take.
- SolusVM Release Notes: the authoritative record of what changed in each release, useful when a control has moved or been renamed since a screenshot was taken.
Warning: This Destroys Everything on the Disk
Installing an operating system from ISO overwrites the VPS disk. Every file, database, mailbox, certificate, configuration file, cron job and log on that server is gone, and there is no undo, no confirmation screen after the fact, and no way to recover from the panel. Treat this as the deliberate destruction of the server's contents, because that is exactly what it is.
Before you go any further:
- Copy your data off the VPS entirely. A backup that lives on the same disk is not a backup for this purpose. Move it to your own machine or to separate storage, and confirm the copy is complete and readable there.
- Record the network settings. Write down the primary IP address, the netmask or prefix, the gateway and any additional IPs assigned to the server. You will very likely need to type them into the installer by hand, and once the disk is wiped there is nowhere left to look them up except the panel and your welcome email.
- Record anything else you cannot rebuild from memory. Firewall rules, DNS records pointing at the server, SSH keys, application licence keys and the exact versions of software you were running.
- Check you actually need a manual install. If you simply want a clean, standard operating system, the automated reinstaller is faster, safer and needs no console work. See How to Reinstall OS Using SolusVM OS-Reinstaller.
Prerequisites
- Access to the SolusVM control panel address, username and password issued when the VPS was set up. These arrive in your welcome email; do not guess the panel address. If you are not signed in yet, start with How to Log in to SolusVM Control Panel.
- A VPS running full virtualisation, such as KVM or Xen HVM. See the section below on why this matters.
- Familiarity with the VNC console, since the entire installation happens there and not over SSH. See How to Access VPS via VNC in SolusVM.
- A block of uninterrupted time. A manual install over a console is not a two-minute job, and abandoning it half way leaves the server with no working operating system at all.
- Your own copy of the data on that server, verified readable. This bears repeating.
Manual Install Only Works on Full Virtualisation
This is the first thing to check, and it saves a lot of confusion when the controls described here are simply not present in your panel.
A full virtual machine, such as a KVM or Xen HVM guest, emulates a complete computer: virtual firmware, a boot device order, a virtual CD-ROM drive and a virtual screen. Because all of that exists, you can hand it an ISO image, tell it to boot from the CD-ROM first, and watch the installer on the screen exactly as you would on a physical machine.
A container-style VPS, such as an OpenVZ or LXC guest, has none of that. It shares the host's kernel and has no firmware, no boot order, no CD-ROM and no screen. There is nothing to boot an ISO with, which is why the Boot Order, CDRom and VNC controls either do not appear or do nothing on a container VPS. On that virtualisation type your only option is the panel's template-based reinstaller, and no amount of hunting through the interface will change that.
If you are unsure which type you have, the panel shows the virtualisation alongside the RAM, disk and IP details: see How to Check the RAM of VPS, IP, Disk Capacity and Virtualization Details in SolusVM.
Step 1: Sign In and Select the Right VPS
Open the SolusVM control panel using the address in your welcome email and sign in with the panel credentials issued for the VPS. These are the control panel credentials, which are entirely separate from the root or administrator password of the operating system inside the VPS.
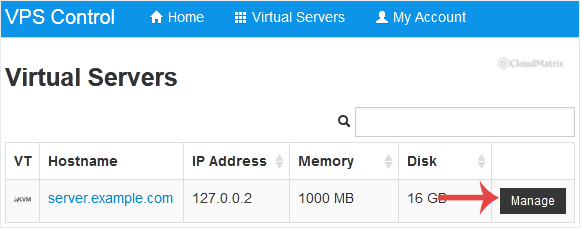
If your account holds more than one virtual server, select the one you intend to reinstall. Check the hostname or the primary IP address shown alongside the entry rather than its position in the list, because the ordering changes as servers are added and removed. Selecting the wrong server here means wiping the wrong server later, and nothing in the steps that follow will warn you.
Step 2: Set the Boot Order to CD-ROM First
Scroll down to the Settings tab and change the boot order to (1) CDROM (2) Hard Disk.
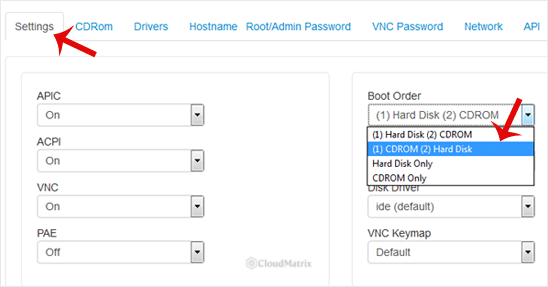
This tells the virtual firmware which device to try first when the machine powers on. With CD-ROM first, a mounted ISO takes priority and the installer starts; if no ISO is mounted, the firmware falls through to the hard disk and the server boots normally.
Two things about this setting catch people out. It is persistent, not one-shot: it stays as you set it until you change it back, so every subsequent reboot will keep trying the CD-ROM first. And it takes effect at the next power cycle, not immediately, so changing it while the server is running does nothing until the server reboots.
Step 3: Mount the Installation ISO
Choose CDRom. If an image is already mounted, click Unmount first, then select the operating system you want from the list and click Mount.
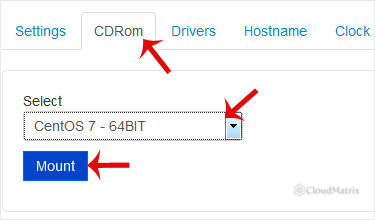
The list contains the ISO images your provider has loaded onto the host machine. You are choosing from that library rather than uploading your own image, so if the operating system or the exact version you want is missing, that is a request to your provider rather than something you can fix in the panel.
Pay attention to which variant you are picking, because it changes how the installation behaves:
- A minimal or netinst image contains only the installer and downloads the packages it needs during installation. It boots quickly, but it will not get past package selection unless networking is configured correctly inside the installer.
- A full or DVD image carries the packages with it and can install without any network access at all. It is the safer choice if you are not certain the network settings will work first time.
- A live image boots into a working desktop or shell rather than straight into an installer, and you have to start the installer from inside it. On a console-only VPS this is usually the harder path.
- The architecture must match the virtual machine. A 64-bit guest runs a 32-bit installer, but a 32-bit guest cannot run a 64-bit one and will simply refuse to boot the image.
Step 4: Reboot the VPS
Click Reboot and confirm with Yes. This is the power cycle that makes the new boot order take effect, so the machine comes back up looking at the CD-ROM first and finds your mounted ISO.
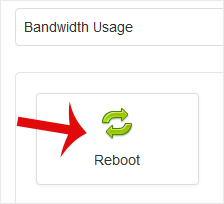
If the server is currently powered off rather than running, use Boot instead: the effect is the same, and the relevant details are in How to Start/Boot Your VPS in SolusVM.
Step 5: Open the VNC Console Immediately
As soon as you have confirmed the reboot, click VNC without waiting.

The urgency is not arbitrary. Most installation media show a boot menu or a "press any key to boot from CD" prompt that waits only a few seconds before timing out. Miss that window and the firmware gives up on the CD-ROM, falls through to the hard disk, and either boots the old operating system or stalls on an empty disk. Neither is a failure you need to fix: just reboot again from the panel with the VNC window already open and waiting.
Understand what VNC is here, because it changes how you work. It attaches to the virtual machine's screen and keyboard, in the same way a monitor and keyboard plug into a physical server. It does not depend on the guest having a network connection, an operating system, or anything at all installed, which is precisely why it is the only way to drive an installer. It also means there is no copy and paste and no file transfer in most builds: whatever you need typed, you type.
Step 6: Connect With the Console Client
The VNC page opens and offers a client. Choose HTML5 VNC Client SSL.
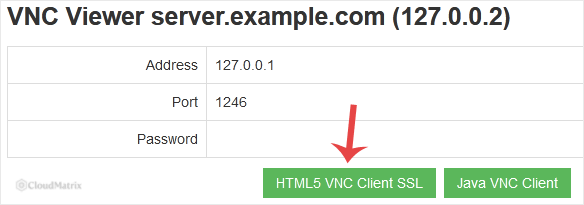
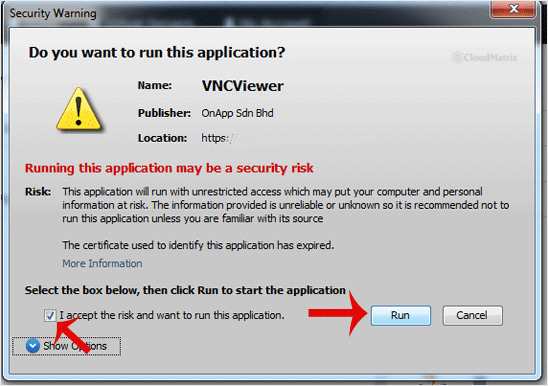
The HTML5 client runs in the browser with no plugin and is the option to use. Older SolusVM builds also offer a Java VNC Client, which is a Java applet: current browsers removed the plugin support that applets rely on years ago, so on a modern machine it usually will not run at all. If you do end up on a system where it still works, accept the security warnings and click Run.
One console habit worth adopting before you start typing anything important: the console sends raw key codes to the virtual machine, and the installer decides what layout those codes mean. If your physical keyboard is not a US layout, symbols such as @, #, / and " can arrive as something else entirely. This bites hardest when you set the root password, because the installer hides what you type and you will not discover the problem until the first login fails. Set the keyboard layout early in the installer if it offers one, and if in doubt choose a password of plain letters and digits for now and change it to something stronger over SSH once the server is up.
Step 7: Start the Installer
Most installation media pause at a boot prompt or a menu. Press any key when prompted, then choose the install entry rather than a media check or a live session, and press Enter.
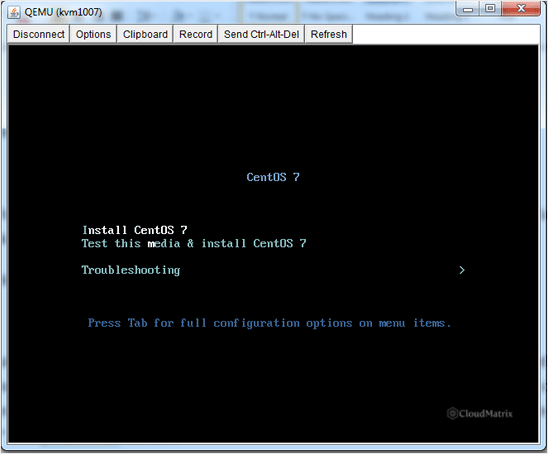
The menu wording varies by operating system, but the pattern is consistent: an install entry, a test or check entry, a rescue or troubleshooting entry, and sometimes a graphical and a text install. On a VPS console the text or basic graphical option is usually the better choice, because it is far more responsive over VNC and never depends on a display driver the virtual hardware does not have. If the graphical installer starts and the screen is unreadable or frozen, reboot and take the text option instead.
Step 8: Work Through the Installer
From here you are in the operating system's own installer, and its screens are documented by whoever wrote it. What follows is the part specific to doing it on a VPS over a console, which is where the real problems live.
Partitioning
This is the reason you chose a manual install, so it deserves thought. A few points that matter more on a VPS than on a physical machine:
- Simple layouts age better. A single root partition plus a small swap area is the layout that causes the fewest problems later. Elaborate schemes with separate partitions for every directory look tidy on day one and become a nuisance the first time one of them fills up while the others sit empty.
- Think about growing later. If you expect the disk to be enlarged in future, LVM makes the in-guest half of that job considerably easier. Note that enlarging a VPS disk is always two jobs: your provider grows the virtual disk, and then you grow the partition and filesystem from inside the guest. Nothing about a disk upgrade happens automatically.
- Separate
/varonly with a reason. Logs and databases live there and it is the partition that fills. If you split it off, size it generously, because a full/varstops mail, databases and logging. - Swap on a VPS is a judgement call. A small swap area gives the kernel somewhere to go under memory pressure instead of killing processes outright. A large one on slow storage just makes a struggling server unresponsive rather than failed.
- Disk encryption needs a passphrase at every boot, typed into the console by hand, every time. On a remote server with no automatic unlock configured, that means the machine will not come back from a reboot on its own. Choose it deliberately or not at all.
Networking
This is the most common way a manual install goes wrong, and it is entirely avoidable. Many VPS networks do not hand out addresses by DHCP, so an installer that is left on automatic configuration will sit there failing to find a network. Have the IP address, netmask or prefix, gateway and a pair of resolver addresses in front of you, and enter them by hand when the installer asks. The address details are visible in the panel, covered in How to Check the RAM of VPS, IP, Disk Capacity and Virtualization Details in SolusVM, and in the details you were sent when the server was provisioned.
If you are using a minimal or netinst image, getting this right is not optional: the installer cannot fetch its packages without it.
Passwords and Remote Access
Set a root or administrator password you can actually retype at a console, subject to the keyboard-layout caution above. Then make sure remote access will exist after the reboot: a minimal Linux install does not always include an SSH server, and even when it does the service is not always enabled to start at boot. If the installer offers an SSH server as a package option, take it. Reinstalling because you locked yourself out of a freshly installed server is a particularly annoying way to spend an afternoon, even though the VNC console will still let you back in to fix it.
Note also that after a custom manual install, the panel's own root password reset feature may no longer work on that server. That feature generally relies on the guest matching the layout of a provider template, so an unusual partition scheme, LVM or full-disk encryption can put the disk beyond its reach. Plan on managing the root password from inside the server from now on, and treat the panel's password reset as a convenience that may or may not still apply.
Hostname
Set the hostname during the install, and keep it consistent with the hostname recorded in the panel. A mismatch is not fatal, but it makes mail delivery, monitoring and log correlation quietly awkward. The panel-side value is covered in How to Change Hostname in SolusVM.
Step 9: Set the Boot Order Back to Hard Disk First
This is the step people skip, and skipping it produces a server that appears to have failed its installation when in fact it installed perfectly.
When the installer finishes, it reboots the virtual machine. If the boot order is still CD-ROM first and the ISO is still mounted, the machine boots the installer again, and you find yourself staring at the same welcome screen you started from. Nothing is broken; the machine is doing exactly what you told it to do.
So once the installation completes:
- Return to the Settings tab and set the boot order back to (1) Hard Disk (2) CD Drive.
- Go to CDRom and click Unmount so no image is attached. Setting the boot order back is enough on its own, but unmounting removes any chance of the same trap catching you at the next reboot, months from now, when you have long forgotten this was ever done.
- Reboot the VPS.
The server should now come up on its newly installed operating system.
How to Confirm the Install Actually Worked
Check these in order, because each tests something the previous one does not:
- The console shows a login prompt. Watch the reboot in VNC. A login prompt from the new operating system means the bootloader and kernel are working and the machine is booting from disk, not from the ISO.
- The panel status reads
online. This confirms the virtual hardware is powered on, and nothing more. See How to Check Whether the VPS Status is "online" or "offline" in SolusVM. - The server answers on the network. Ping the primary IP from your own machine. A reply proves the kernel is up and the network settings you typed into the installer are correct. Some networks filter ICMP, so silence here is suggestive rather than conclusive.
- Remote access works. Connect over SSH, or RDP for a Windows guest. This is the test that matters, because it proves you no longer depend on the console.
- Reboot once, deliberately. Reboot the VPS from the panel and confirm it comes back on its own without the console. This catches a boot order left on CD-ROM, a bootloader written to the wrong device, and services that were started by hand but never enabled at boot. Finding any of those now is far cheaper than finding them during an unplanned outage six months from now.
Troubleshooting
- Symptom: there is no CDRom, Boot Order or VNC option in the panel. The VPS is almost certainly a container-style guest with no virtual CD-ROM or firmware to boot one from. Use the template-based reinstaller instead: How to Reinstall OS Using SolusVM OS-Reinstaller.
- Symptom: the VPS boots the old operating system instead of the installer. Either the ISO is not mounted, the boot order was not changed, or the boot order change was made after the reboot rather than before it. Confirm both settings, then reboot again. Remember that a boot order change only applies from the next power cycle.
- Symptom: the boot prompt appears and then vanishes before you can press anything. You reached the console too late. Reboot from the panel with the VNC window already open and focused, and press a key as soon as the prompt appears.
- Symptom: the VNC console is black or blank. Give it a few seconds, since the screen only refreshes when the guest draws to it. If it stays black, close and reopen the session. If it still stays black after a reboot, check that VNC is enabled for the server, covered in How to Turn APIC, ACPI, VNC, or PAE On or Off in SolusVM, and that the VNC password is what you think it is, per How to Change the VNC Password in SolusVM.
- Symptom: the installer starts but reports that it cannot find any disk to install to. The virtual disk is presented with a driver the installation media has no driver for. Virtio is the usual culprit, particularly with older or Windows installation images, which ship no Virtio driver by default. Switch the disk driver to IDE for the installation using How to Change the Disk Driver to Virtio or IDE in SolusVM, then reboot and start again.
- Symptom: the installer finds the disk but no network interface. Same problem, different device. Change the network card model using How to Change the Network Card to Virtio, Intel PRO, or Realtek in SolusVM. Intel PRO or Realtek are recognised by almost every installer without extra drivers, while Virtio needs support that older media may not have.
- Symptom: the installer will not boot at all, or panics immediately. Check the image architecture against the guest first. After that, the ACPI, APIC and PAE toggles are the usual cause: older and 32-bit operating systems can refuse to start when these do not match what they expect. They are covered in How to Turn APIC, ACPI, VNC, or PAE On or Off in SolusVM.
- Symptom: the install finished, but rebooting lands back in the installer. The boot order is still CD-ROM first, the ISO is still mounted, or both. Set it back to hard disk first, unmount the image, and reboot. The install itself is fine.
- Symptom: the install finished and the machine now says there is no bootable device. The bootloader was not written, or was written to a device the firmware does not boot from. This happens most often with unusual partition layouts, or when the installer was pointed at a partition rather than the whole disk. Boot the ISO again, choose the installer's rescue or repair mode, and reinstall the bootloader to the disk itself.
- Symptom: the operating system installed but nothing responds on the network, while the console shows a healthy login prompt. The network settings entered during installation are wrong, or the interface was not brought up at boot. Log in at the VNC console, since that session does not need the network, and correct the address, netmask, gateway and resolver configuration from there. Compare them against the values shown in the panel.
- Symptom: the console keyboard types the wrong characters, or the root password you set will not work. Almost always a keyboard layout mismatch between your machine and the guest. Log in at the console and reset the password using only unambiguous characters, then set the layout inside the operating system before choosing anything more complex.
After the Install
A freshly installed server has none of the hardening or configuration the previous one accumulated, so treat the first hour as part of the job rather than as optional tidying. Apply all available updates before the server does anything useful, since an image on a host library can be months old and the gap between its packages and current ones is exactly where the known vulnerabilities sit. Configure the firewall before you expose any service. Set up your SSH keys and consider disabling password authentication once key access is proven to work. Enable every service you depend on to start at boot, then reboot once to prove it does. And put a backup routine in place immediately, because the empty state of a fresh install is the one moment when the absence of backups costs nothing and is therefore easiest to overlook.
If a manual install leaves a VPS unbootable and the troubleshooting above has not got you back in, gather the detail before escalating: the exact wording on the console, the ISO you mounted, the boot order and driver settings, and the point in the installation where it went wrong. Those details separate a fault inside the guest from a problem with the virtual hardware underneath it, and they save a round of questions. If you are a Noiz client and you are unsure how to read what the console is telling you, open a support ticket with the Noiz support team and they will help you interpret it.






