PHP extensions (also called PHP modules) are the optional libraries that give PHP its extra abilities: image manipulation, mail parsing, encoding, database drivers and so on. On a cPanel account that runs the CloudLinux PHP Selector, you control which of those extensions are loaded for your own account, without a support ticket and without touching a server-wide configuration file.
This guide shows you how to enable or disable any available extension for your account, and explains the behaviour that catches most people out: the native PHP version restriction, the fact that your selection is stored per PHP version, and the memory cost of switching everything on.
Last reviewed: 27 July 2026, against cPanel & WHM version 134 (the current stable and LTS tier) with the CloudLinux PHP Selector. This guide is written for Noiz hosting and is kept current against cPanel and CloudLinux. It complements, and does not replace, the official documentation linked below.
Official Documentation Reference
- CloudLinux OS: PHP Selector: how the Selector works and what it can change.
- CloudLinux OS: PHP Extensions: how extensions are packaged per alternative PHP version.
- CloudLinux OS: Bundled PHP Extensions: the extensions bundled into the base package and always present.
- PHP Manual: Extensions: what each extension actually does.
- cPanel Documentation: MultiPHP Manager: the alternative interface used when the CloudLinux Selector is not present.
Prerequisites
- Login details for the cPanel account whose site you want to change.
- A Select PHP Version icon in the Software section of cPanel. If that icon is missing, the account is not using the CloudLinux PHP Selector and this procedure does not apply.
- Knowledge of which extension your application needs. Your software vendor's requirements page is the authority on that, not guesswork.
Enable or Disable a PHP Extension
Step 1: Open Select PHP Version
- Log in to your cPanel account.
- In the Software section, click Select PHP Version.

Step 2: Open the Extensions tab
- Click the Extensions menu.
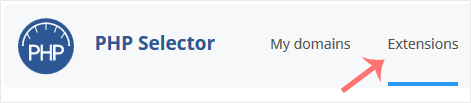
Note: if the Extensions page shows an error mentioning the native PHP version, change the account to a non-native PHP version first, then come back. This is expected behaviour and is explained under Why the native version blocks the Extensions tab below.
Step 3: Tick or untick the extension
- To enable an extension, tick its checkbox.
- To disable an extension, untick its checkbox.
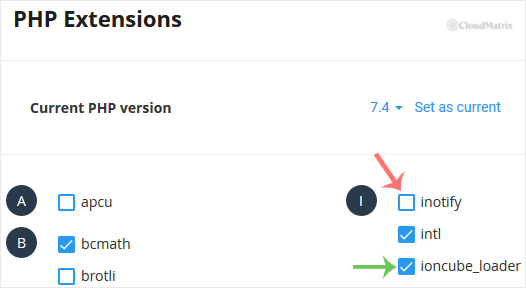
The change is saved as soon as the box is ticked, so there is no separate Save button and no server restart. It applies to new PHP requests, so reload your site rather than trusting a page that was already cached in your browser.
What You Need to Know Before You Start Ticking Boxes
Why the native version blocks the Extensions tab
The CloudLinux PHP Selector only manages the alternative PHP versions it installs alongside the system PHP. The version labelled native is the PHP that was compiled for the whole server, and its extension set is controlled at server level for every account at once. That is why the Selector refuses to show you a per-account extension list while your account is set to native: there is nothing there it is allowed to change on your behalf.
Set the account to a specific version such as 8.3 on the Current PHP version screen, and the Extensions tab becomes usable. See How to Change the PHP Version via CloudLinux Selector in cPanel for that step.
Your extension selection is stored per PHP version
This is the single most common surprise. The list of enabled extensions belongs to the PHP version it was set on. If you enable mailparse on PHP 8.2 and later move the account to PHP 8.4, the new version starts from its own defaults and your extension will not be carried across. After every PHP version change, return to the Extensions tab and confirm your selections are still in place.
Enabling everything is a real cost, not a free option
Every loaded extension is loaded into each PHP process that serves your site, and that memory counts against the resource limits applied to your hosting account. Ticking the whole list is the quickest way to hit a memory limit and start seeing 500 errors or "resource limit reached" pages under traffic. Enable what your application actually requires and leave the rest alone.
Extensions are not the same as PHP settings
The Extensions tab loads libraries. The Options tab changes php.ini directives such as memory_limit, max_execution_time, upload_max_filesize and allow_url_fopen. If the thing you are hunting for is a value rather than a library, it lives under Options. See How to Enable or Disable PHP's allow_url_fopen Using CloudLinux Selector in cPanel for a worked example.
Some extensions are already built in
A number of extensions are compiled into the base PHP package and are always active, so they never appear as a tickable option. If an extension you need is not in the list and your application reports it as missing anyway, check a phpinfo() page before assuming it is absent.
Worked Examples
The procedure above is the same for every extension. These articles walk through the three requests Noiz support sees most often, including the application-specific detail each one needs:
- How to Enable ionCube Loader Using CloudLinux Selector in cPanel: required by commercial PHP applications that ship encoded source files.
- How to Enable the GD Extension of PHP Using CloudLinux Selector in cPanel: image resizing and thumbnail generation, needed by most CMS platforms.
- How to Enable the Mailparse Extension of PHP Using CloudLinux Selector in cPanel: parsing inbound mail, used by ticket systems and mail-to-database scripts.
Confirming the Extension Loaded
Do not rely on the tick box alone. Confirm from PHP's own point of view:
- Create a file called
phpinfo.phpin yourpublic_htmldirectory containing the single line below. - Visit
https://yourdomain.com/phpinfo.php(replaceyourdomain.comwith your own domain). - Search the page for the extension name. If it has its own section, it is loaded.
- Delete the file when you are finished. It exposes your PHP configuration to anyone who finds it.
<?php phpinfo();Checking through the browser matters, because the PHP used for web requests and the PHP used on the command line can be configured differently. A php -m listing over SSH is not proof that your website sees the same extension.
Troubleshooting
Symptom: the Extensions tab shows an error about the native PHP version. Fix: switch the account off native to a specific PHP version, then reopen the tab.
Symptom: the extension is ticked but the application still reports it as missing. Fix: confirm which PHP version the domain is actually using, especially if the site lives in a subdirectory or an addon domain with its own setting, then confirm through a phpinfo() page rather than the CLI.
Symptom: extensions you enabled previously have all reverted. Fix: the PHP version was almost certainly changed. Selections are stored per version, so re-enable them on the version now in use.
Symptom: the site started returning 500 errors shortly after enabling several extensions. Fix: untick the ones the application does not require. Each extension consumes memory in every PHP process, and the account's memory limit is finite.
Symptom: the extension you need is not in the list at all. Fix: it may not be packaged for that PHP version. Try a newer PHP version, or open a ticket with Noiz so the request can be checked against what is available on the server.
A Note on PHP Versions
Enabling extensions on a PHP branch that no longer receives security fixes is effort spent propping up a version you should be leaving. As at this review, the PHP project supports the 8.2, 8.3, 8.4 and 8.5 branches. If your account is still on an older branch, plan the upgrade first, then set your extensions on the version you land on.
Need a Hand?
If your application needs an extension that is not offered, or you are unsure which extensions your site genuinely requires, open a ticket from the Noiz client area with the application name and the exact error message. Noiz support can confirm what is available for your PHP version and set it correctly on your account.






