Rescue mode boots your VPS into a small temporary recovery system instead of your own installed operating system, so you can mount the real disk and copy data off a server that will not start properly. Once the recovery work is finished you have to switch rescue mode back off again, otherwise the VPS keeps booting the recovery system and your own sites, mail and databases stay offline. This guide shows you how to disable rescue mode from the Virtualizor Enduser Panel and how to confirm the VPS has come back up on its real operating system.
Last reviewed: 27 July 2026, against the current Virtualizor release and its Enduser Panel. This guide is written for Noiz hosting and is kept current against Virtualizor. It complements, and does not replace, the official Virtualizor documentation linked below.
Official Documentation Reference
- Virtualizor Enduser Panel: Rescue Mode
- Virtualizor Enduser Panel: Manage VPS
- Virtualizor Enduser Panel: List VPS
Prerequisites
- Your Virtualizor Enduser Panel login. See How to Log In to the Virtualizor VPS Control Panel.
- A VPS that is currently running in rescue mode. If you need the companion procedure, see How to Start Your VPS in Rescue Mode Using Virtualizor.
- Any files you rescued already copied off the server, because the recovery environment itself is temporary and is discarded when rescue mode is switched off.
Why Rescue Mode Has to Be Switched Off
Rescue mode is not a one-off boot. For as long as it is enabled, every start and every reboot brings up the temporary recovery system rather than your installed operating system. That means the VPS answers on its IP address and accepts SSH, yet none of your own services are running: no web server, no mail, no database, no control panel. This is the single most common reason a VPS looks alive but every site on it is down after a recovery session.
If uptime monitoring is pointed at the server, expect it to keep alerting until rescue mode is off and the real system has booted.
Finish Your Recovery Work First
Before switching rescue mode off, tidy up inside the recovery environment so the real operating system boots cleanly:
- Copy everything you need off the server, or onto the mounted original disk. Anything left only in the recovery system is lost.
- Flush pending writes and unmount the original disk you mounted, for example
syncfollowed byumount /mnt. Disabling rescue mode with the disk still mounted and dirty can trigger a filesystem check on the next boot, which makes the VPS look like it is hanging when it is really repairing itself. - Close any SSH sessions into the recovery system.
Disable Rescue Mode in Virtualizor
Step 1: Log in to Virtualizor
Log in to your Virtualizor Enduser Panel.
Step 2: Open the VPS list
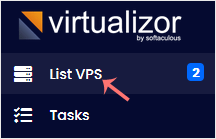
From the left side panel, click List VPS.
Step 3: Open the VPS you want to manage
Hover your mouse over the appropriate VPS and that row will be highlighted. Then click the Manage icon in the highlighted row.

Step 4: Open Rescue Mode
Click Rescue Mode. Depending on your Virtualizor version and theme this appears either as a tab or as a button on the Manage VPS page, but the label is the same.

Step 5: Disable rescue mode
Click Disable Rescue Mode. Virtualizor switches the VPS back to its normal boot configuration and starts it on your own installed operating system.
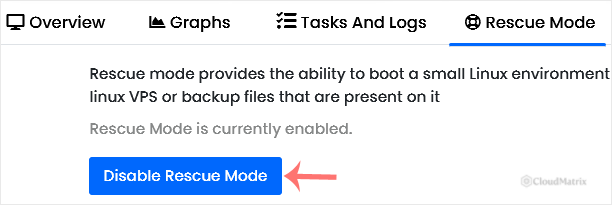
Your VPS will now start in normal mode. Give it a minute or two to boot and for services to come up before you judge whether it is working.
After Disabling: Confirm the VPS Booted Normally
- Log in with your normal server credentials. The password you set when you switched rescue mode on belongs to the temporary recovery system only, and it does not change the root password of your real operating system.
- Load one of your sites, and check that mail and any database driven applications respond.
- If SSH now refuses to connect with a warning that the remote host identification has changed, that is your SSH client remembering the recovery system's host key from your rescue session. Remove the stale entry with
ssh-keygen -R yourdomain.com, replacingyourdomain.comwith your own server name or IP address, then connect again and accept the key. - If the boot itself is what you want to watch, open the console. See How to Access Your VPS via the VNC Console in Virtualizor.
Troubleshooting
Symptom: Virtualizor shows that no actions are allowed. While rescue mode is active most VPS actions are deliberately locked out. Click the Reload this page icon to refresh the page. All actions become visible again once rescue mode has been disabled.
Symptom: the page still shows Enable Rescue Mode and nothing changed. The change has already been applied and the page is showing you the next available action. Refresh the page and confirm the VPS status, rather than clicking again, which would put the VPS straight back into rescue mode.
Symptom: the VPS is reachable but every site returns a connection error. The VPS is almost certainly still in the recovery system. Recheck the Rescue Mode page and confirm the button reads Enable Rescue Mode, which means rescue mode is currently off.
Symptom: there is no Rescue Mode option on the Manage VPS page at all. Virtualizor offers rescue mode on KVM and Xen based virtualisation only, so a VPS built on another virtualisation type will not show it. To check what your VPS runs on, see How to Check VPS RAM, IP, Disk Capacity, and Virtualization Type in Virtualizor.
Symptom: the VPS takes far longer than usual to come back. A filesystem check after an unclean unmount, or services waiting on a network mount, will both do this. Watch the console output before forcing another reboot, because interrupting a filesystem repair can make the damage worse. If it is still not up after a reasonable wait, see How to Reboot or Restart a VPS in Virtualizor.
Need a Hand?
If the VPS will not boot cleanly after rescue mode is disabled, or you are not sure whether the underlying problem that sent you into rescue mode has actually been fixed, open a ticket with the Noiz support team from your client area and include the VPS hostname, roughly when the fault started, and what you did inside the recovery environment. That detail lets the team pick up where you left off instead of starting the diagnosis again.






