Rescue mode is the tool you reach for when your VPS will not boot, when a configuration change has locked you out, or when a filesystem problem is stopping the operating system from starting normally. This guide shows you how to switch it on from the Virtualizor Enduser Panel on your Noiz VPS, what actually happens when you do, and how to get at your data once you are in.
The product is called Virtualizor (not "Virtualizer"); you may also see it referred to simply as the VPS control panel in your Noiz welcome email.
Last reviewed: 27 July 2026, against the current Virtualizor release and its Enduser Panel. This guide is written for Noiz hosting and is kept current against Virtualizor. It complements, and does not replace, the official Virtualizor documentation linked below.
Official Documentation Reference
What Rescue Mode Actually Does
This is the part most guides skip, and it is the part that saves you an hour of confusion.
Rescue mode does not repair your VPS, and it does not boot your operating system in a reduced state. Instead, Virtualizor boots your VPS from a small, separate, Debian-based rescue system held on the host. Your own disk is left untouched and is simply attached to that rescue system, so you can mount it and work on it as an ordinary block device.
Two consequences follow from that, and both catch people out:
- Your sites, mail and services stay offline for as long as rescue mode is on. Nothing from your installed operating system is running. Rescue mode is a maintenance window, not a fallback that keeps you serving traffic.
- The password you set is the rescue system's root password, not your VPS root password. You are logging in to a different machine that happens to have your disk plugged into it. Your own root password is irrelevant here, which is exactly why rescue mode works when you have lost or broken it.
Prerequisites
- Your Virtualizor Enduser Panel login, from your Noiz VPS welcome email.
- An SSH client, or access to the VNC console if SSH will not connect. See How to Access Your VPS via the VNC Console in Virtualizor.
- A KVM-based or Xen-based VPS. Virtualizor supports rescue mode on KVM, Xen HVM and Xen PV. If the Rescue Mode option does not appear on your Manage VPS page, your VPS runs a virtualisation type that does not offer it, and Noiz support can boot a rescue environment for you instead.
- Somewhere to copy data to, if recovery rather than repair is the goal.
Enable Rescue Mode
1. Log in to the Virtualizor Enduser Panel
Use the panel address and credentials issued with your VPS.
2. Open the VPS list
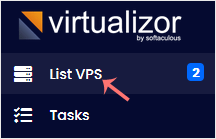
From the left side panel, click List VPS.
3. Open the VPS you want to rescue
Hover over the appropriate VPS so its row is highlighted, then click the Manage icon on that row.

4. Open the Rescue Mode tab
On the Manage VPS page, click Rescue Mode.

5. Set a rescue password and enable
Enter a password, then choose Enable Rescue Mode. Treat this as a real credential: it grants root on a machine that has your entire disk attached to it. Use a long, unique password rather than something you will type twice and forget.
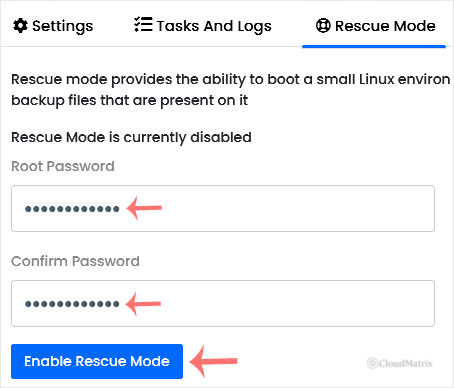
Allow a few minutes for the change to take effect. The very first time rescue mode is used on a VPS, Virtualizor has to fetch the rescue template, so three to five minutes is normal; later switches are quicker.
Get In and Reach Your Data
Once rescue mode is active, connect over SSH to the same IP address as always, as root, using the rescue password you just set. If SSH does not connect, use the VNC console instead.
You are now on the rescue system, so your own filesystem is not mounted yet. List the attached block devices first:
lsblkIdentify your VPS's root partition in that output, then mount it. Device naming varies by virtualisation type and partition layout, so use what lsblk actually shows you rather than copying a device name from a guide:
mkdir -p /mnt/vps
mount /dev/vda1 /mnt/vps
ls /mnt/vps
Your files are now under /mnt/vps. On some container-based VPS types Virtualizor mounts the original disk at /mnt for you, so check there before mounting anything by hand.
A few practical notes for the work itself:
- Copy before you repair. If the data matters, pull it off the server first with
scporrsyncfrom your own machine, then start editing configuration files. A rescue session is the wrong time to discover that your fix made things worse. - Editing configuration is the common case. Undoing a bad
/etc/fstabline, a broken SSH server config or a firewall rule that locked you out is usually a one-line edit under/mnt/vps/etc. - Resetting a lost root password is done with
chroot /mnt/vpsfollowed bypasswd, so that the change is written into your own system rather than the rescue one. - Unmount cleanly with
umount /mnt/vpsbefore you disable rescue mode, so nothing is left half-written.
Turn Rescue Mode Off Again
Rescue mode stays on until you switch it off, and your VPS stays offline the whole time. When the work is done, return to the same Rescue Mode tab and choose Disable Rescue Mode, then let the VPS boot normally and confirm your services are back.
Full steps are in How to Disable Rescue Mode in Virtualizor.
Troubleshooting
Symptom: Virtualizor says no actions are allowed. Most VPS actions are deliberately blocked while rescue mode is active. Click the Reload this page icon to refresh the panel; the full action set returns once rescue mode has been disabled.
Symptom: SSH refuses to connect with a host key warning. This is expected, and it is not an attack. The rescue system is a different machine with a different SSH host key, so your client flags the mismatch. Remove the stale entry on your own computer with ssh-keygen -R your.vps.ip.address and connect again. You will see the same warning in reverse when you disable rescue mode and your real system comes back.
Symptom: SSH does not respond at all. Give it the full three to five minutes on a first use. If it still will not connect, reach the rescue system through the VNC console, which does not depend on networking inside the VPS at all.
Symptom: the password is rejected. Remember that rescue mode wants the password you typed on the Rescue Mode screen, not your usual VPS root password. If in doubt, disable rescue mode, then enable it again with a freshly set password.
Symptom: mount reports the filesystem is already mounted or in use. The disk may already be attached at /mnt. Run lsblk and mount | grep /mnt to see what is currently in place before mounting again.
Symptom: websites and email are down while you work. That is rescue mode behaving correctly, because your own operating system is not running. Plan the session accordingly and disable rescue mode as soon as the repair is complete.
Need a Hand?
If your VPS will not boot even after rescue mode, or you are not confident working on a broken filesystem, open a ticket from your Noiz client area and the support team will take a look with you. If your VPS is on a Noiz managed plan, ask support to handle the rescue and repair rather than working through it yourself.






