This guide shows you how to install or reinstall an operating system on a Noiz VPS by booting it from an ISO image in Virtualizor and stepping through the installer yourself over the VNC console. This is the manual route, and you use it when you need control that the one-click reinstaller cannot give you: a custom partition layout, your own LVM or RAID scheme, encrypted volumes, a specific filesystem, or an operating system that is not on the template list.
If you do not need any of that, use the automatic reinstaller instead. It is faster, it configures networking for you, and it is far harder to get wrong. See How to Reinstall an OS Using the Virtualizor Automatic OS-Reinstaller. The manual method exists precisely because the automatic reinstaller does not let you touch the partition table.
This procedure destroys everything on the VPS. Once you start the installer and write a partition table, the existing operating system, websites, databases, mail and configuration on that disk are gone, and there is no undo. Take a full backup off the server first and confirm you can actually restore from it. A backup you have never tested is not a backup.
Last reviewed: 27 July 2026, against the current Virtualizor release and its end-user panel. This guide is written for Noiz hosting and is kept current against Virtualizor. It complements, and does not replace, the official Virtualizor documentation linked below.
Official Documentation Reference
- Virtualizor End User: Enduser ISO
- Virtualizor: Changing Boot Order
- Virtualizor End User: VNC
- Virtualizor End User: Manage VPS
Prerequisites
- Your Virtualizor end-user panel URL and login details, which are in your Noiz VPS welcome email.
- A verified, off-server backup of anything on the VPS you cannot lose.
- An ISO available to your account in the Select ISO list. If the list is empty or does not contain the image you need, open a ticket and ask Noiz to make it available.
- The network details for the VPS: its IP address, subnet mask, gateway and nameservers. You will need to type these into the new system by hand. They are shown in the panel and in your welcome email.
- A working browser for the VNC console. See How to Access VPS via VNC in Virtualizor.
Read This Before You Start
A manual ISO install is not the same job as an automatic reinstall, and the differences catch people out afterwards rather than during.
- Networking is not configured for you. The automatic reinstaller injects the VPS network settings into the new system. A manual install does not, so the server will very likely come up with no working network at all. You configure the IP address, gateway and DNS by hand from the console during or immediately after the install. Have those details open in another tab before you begin.
- SSH may not be installed. Minimal installer profiles frequently leave out the SSH server. If you finish the install, reboot and find you cannot connect, the usual cause is that there is nothing listening on port 22 yet. Install and enable the SSH server from the VNC console.
- Only the console works until networking does. Everything between starting the installer and getting the network up happens over VNC. Treat the VNC console as your lifeline, not as a fallback.
- Record every password you set. You are creating this system from scratch, so the root password is whatever you type into the installer. Nothing else knows it.
- The disk will usually appear as
/dev/vdarather than/dev/sda, because the virtual disk is presented over virtio. That is normal. If the installer claims it cannot find any disk at all, it is missing virtio storage drivers, which is common with Windows and some older or minimal Linux images.
Step 1: Attach the ISO and Change the Boot Order
The VPS boots from its hard disk by default. To run an installer you have to attach the ISO and tell the VPS to look at the virtual CD drive first.
- Log in to your Virtualizor end-user panel.
- From the left-hand menu, click List VPS.
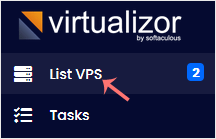
- Hover over the row for the VPS you want to install. The row highlights. Click the Manage icon on that row.

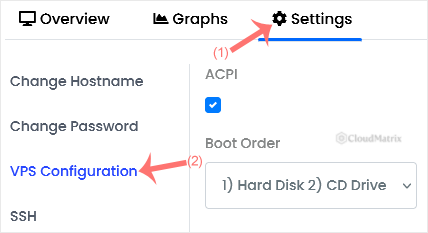
- Click Settings and choose VPS Configuration.
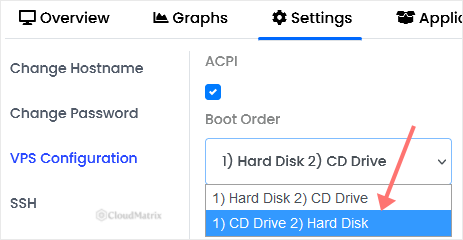
- Change Boot Order to (1) CD Drive (2) Hard Disk.
- Under Select ISO, choose your ISO from the drop-down list. Make sure VNC is enabled, leave the remaining options alone, then click Submit.
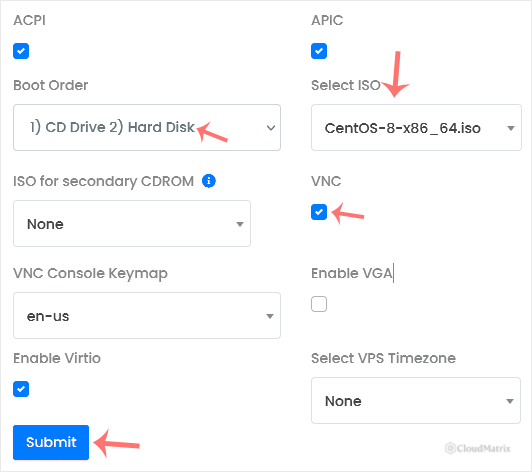
Both changes have to be saved together. An ISO attached with the boot order still on hard disk first will simply boot the old operating system, and a CD-first boot order with no ISO attached will drop the VPS to a boot failure screen. If you want console access on a VPS that is otherwise fine, use How to Enable or Disable APIC, ACPI and VNC in Virtualizor instead of touching the boot order.
Step 2: Restart the VPS and Open the Console Immediately
The next part is a race, and it is the step people most often have to repeat.
- Restart the VPS by clicking the Reboot icon.

- Click VNC straight away, without waiting for the reboot to finish.

- A pop-up appears. Click HTML5 VNC Client.
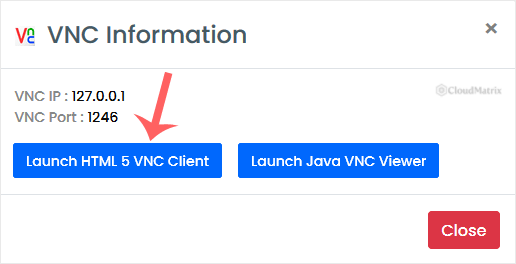
Why the hurry: most installer images show a Press any key to boot from CD prompt that lasts only a few seconds. Miss it and the VPS falls through to the hard disk and boots the old system, or hangs on a blank screen. If that happens, nothing is broken. Reboot and try again, with the console already open.
If the ISO does not appear to attach on a reboot, stop the VPS completely and then start it again rather than rebooting. A full power cycle is the reliable way to make a virtual machine pick up newly attached media, and it is what the Virtualizor documentation recommends.
Step 3: Work Through the Installer
From here you are inside the operating system's own installer, and the steps belong to that operating system rather than to Virtualizor. The pattern is the same across nearly all of them.
- At the boot prompt, press any key when asked, then choose the install option. Menus commonly offer something like Install alongside Test this media or a live session. Select the install entry and press Enter.
- Answer the language, keyboard and timezone questions.
- At the storage step, choose manual or custom partitioning. This is the whole reason for doing the install this way, so do not accept the automatic layout unless you have changed your mind about needing a custom one.
- Set the root password and create any user accounts.
- If the installer offers a software selection, include the SSH server. It saves a console-only recovery session later.
- Let the installation finish, then reboot when prompted.
Console quirks worth knowing. The HTML5 console passes keystrokes straight to the virtual machine, so some browser and operating system shortcuts are intercepted before they reach the server. Copy and paste between your desktop and the console is limited, which matters when you are typing a long partition path or a complex password. Graphical installers are also slower and jerkier over VNC than a text-mode installer, so if the image offers a text or minimal install mode, it is usually the smoother choice.
If VNC disconnects, click Connect to reconnect. Disconnections are common at the moment the installer switches graphics mode or when the VPS reboots, and they do not interrupt the installation itself. The install keeps running on the server whether or not your browser is watching.
Step 4: Set the Boot Order Back to Hard Disk
Do not skip this. It is the single most common mistake with a manual install.
- Go back to Settings and then VPS Configuration.
- Change Boot Order back to (1) Hard Disk (2) CD Drive.
- Detach the ISO if the option is available, then click Submit.
- Reboot the VPS and confirm it comes up into the newly installed system.
Leave the boot order on CD first and the VPS starts the installer again on every single boot instead of the system you just installed. That is confusing at the best of times and genuinely dangerous the day an unattended reboot happens and someone assumes the server is broken and reinstalls it.
Step 5: Bring the Server Back Online
A freshly installed system is a blank machine on your IP address. Before you call the job done:
- Configure the static IP address, subnet mask, gateway and nameservers from the console, then confirm the server can reach the internet.
- Install, enable and start the SSH server if the installer did not, and check you can log in over SSH from your own machine.
- Apply all pending security updates before exposing anything to the public internet. A machine installed from an older ISO is behind on patches from the moment it boots.
- Configure a firewall. A default install typically has nothing filtering traffic.
- Restore your data and reinstall your control panel or application stack.
Troubleshooting
Symptom: the VPS boots the old operating system instead of the installer. Either the boot prompt timed out before you pressed a key, or the boot order did not save. Recheck VPS Configuration, then stop and start the VPS with the console already open.
Symptom: the Select ISO drop-down is empty. No ISO has been made available to your account. Open a ticket with the image you need.
Symptom: the VNC console is blank or black. Give it a moment, since the screen stays blank between the reboot and the installer starting. If it stays blank, confirm VNC is enabled in VPS Configuration, then click Connect to reconnect.
Symptom: the installer reports that no disk was found. The image is missing virtio storage drivers. Load them during setup, which is a standard step for Windows installs, or use an image that includes them.
Symptom: the install finished but the server has no network. Expected, and normal for a manual install. Configure the IP address, gateway and DNS by hand from the VNC console.
Symptom: SSH refuses the connection after a successful install. The SSH server is probably not installed or not enabled. Install it and enable it at boot from the console, and check the new system's firewall is allowing port 22.
Symptom: the panel's root password reset does not work on the new system. Panel-side password resets rely on a recognisable standard disk layout. Unusual, encrypted or heavily customised layouts can defeat them, which is another reason to write down the password you set during the install.
Related Guides
- How to Reinstall an OS Using the Virtualizor Automatic OS-Reinstaller
- How to Access VPS via VNC in Virtualizor
- How to Enable or Disable APIC, ACPI and VNC in Virtualizor
- How to Start or Boot Your VPS in Virtualizor
Need a Hand?
If the ISO you need is not in the list, the installer cannot see the disk, or the VPS will not boot into the new system afterwards, open a support ticket from your Noiz client area. The support team can check the host node, confirm what the virtual machine is actually booting from and get the console back for you. If you would rather not run the install yourself, ask and Noiz will handle it.






