Once FileZilla is connected to your Noiz hosting account, uploading is a matter of dragging files from your computer into the right folder on the server. This guide shows you how to do that reliably: where the files have to land, how to avoid the silent mistakes that leave your site showing the wrong page, and how to confirm the upload actually worked. The worked example throughout is the one most people need first, which is getting an index file live so your domain stops showing a placeholder page, but the same steps apply to any file or folder you upload.
The steps below apply to any Noiz hosting account, whichever control panel your account uses. FTP is a server-level service, so what matters is the FTP user and the folder you upload into rather than any particular panel screen.
Last reviewed: 27 July 2026, against FileZilla Client 3.x (current stable series). This guide is written for Noiz hosting and is kept current against FileZilla. It complements, and does not replace, the official FileZilla documentation linked below.
Official Documentation Reference
- FileZilla Client Tutorial: the vendor walkthrough of the interface and a first transfer.
- Using FileZilla: the transfer queue, directory comparison and synchronised browsing.
- FileZilla Data Type: how ASCII and binary transfer types are chosen, and when to override them.
Prerequisites
- FileZilla Client installed on your computer. See How to Install FileZilla on Windows.
- A working FTP connection to your hosting account. See How to Connect to Your FTP Account Using FileZilla.
- The files you want to upload, already saved somewhere you can find on your own computer.
Step 1: Connect to Your Hosting Account
Open FileZilla and enter your FTP Host, Username and Password in the Quick Connect bar across the top of the window, then click Quickconnect. The host is normally ftp.yourdomain.com or yourdomain.com, replacing yourdomain.com with your own domain.
Use the FTP username and password that belong to your hosting account. These are the credentials created for the FTP user in your hosting control panel, not your Noiz client area login and not your email password. If you have never created an FTP user, the main hosting account username usually doubles as one; if you are unsure, check your Noiz welcome email or your control panel's FTP section.

Leave Port blank unless Noiz has given you a specific port. For anything beyond a quick test, set the connection up in the Site Manager with encryption required, as described in the FTP connection article linked above, so your password is never sent in clear text.
Step 2: Open Your Web Root Folder
This is the step that catches most people out. When you log in, FileZilla usually drops you into the home directory of the FTP user, not into the folder your website is actually served from. Files left in the home directory are invisible to visitors.
In the right pane, which is the server side, find and double-click your web root folder. Its name depends on the platform your account runs on, and is commonly public_html, httpdocs or web. If you are not sure which folder is yours, the one already containing site files or a placeholder page is almost always it.
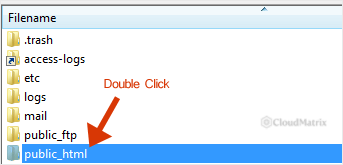
If your account hosts more than one domain, each add-on or additional domain has its own folder, often nested inside the main web root or under a domains directory. Upload into the folder belonging to the domain you are working on, otherwise your files go live on the wrong site. If the FTP user was created and scoped to a single site, you may land straight in that site's web root and see your existing files immediately.
Step 3: Find the Files on Your Computer
In the left pane, which is the local side, browse to the folder holding the files you want to upload. The upper part of the left pane is a directory tree and the lower part lists the files in the selected folder.
If you are uploading a website you downloaded or exported, make sure you are pointing at the folder that contains index.html or index.php directly, not at a parent folder that contains a single subfolder. Uploading the wrapper folder is a common cause of a site that loads a directory listing instead of a homepage.
Step 4: Upload
Select the file or files you want, right-click the selection and choose Upload. Dragging the selection from the left pane into the right pane does exactly the same thing.
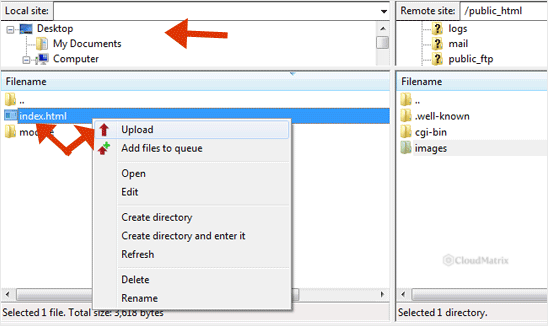
A few practical points:
- Multiple files: hold Ctrl to pick individual files or Shift to select a range, then upload them in one action.
- Whole folders: uploading a folder recreates it, with everything inside it, in whichever remote directory the right pane is currently showing. Confirm the right pane is where you want the folder to land before you start.
- Hidden files: files whose names begin with a dot, such as
.htaccess, are not shown by default. Turn on Server then Force showing hidden files so you can see and manage them. - Archives do not extract: uploading a
.zipfile leaves it on the server as a.zipfile. FTP has no extract command, so either upload the extracted files or extract the archive using the file manager in your control panel.
Step 5: Watch the Queue and Confirm the Result
The panes along the bottom of the FileZilla window show the transfer progress. Three tabs matter:
- Queued files: still waiting to transfer.
- Failed transfers: anything that did not complete. Right-click here and choose Reset and requeue all to retry.
- Successful transfers: the confirmed uploads.
Do not close FileZilla while the queue is still running. A quiet progress bar is not the same as an empty queue, so check the Failed transfers tab before you walk away. Once the queue is empty and nothing has failed, the file should be visible in the right pane with the size it has locally.
Then load your domain in a browser. If you have just replaced a homepage, force a hard refresh so you are not looking at a cached copy: Ctrl + F5 on Windows or Cmd + Shift + R on macOS.
Gotchas Worth Knowing Before You Upload
Filenames are case sensitive on the server. Linux treats Index.html, INDEX.HTML and index.html as three different files, and only the lowercase one is served as a default document. Windows hides this from you locally, so a site that worked perfectly on your own machine can break the moment it is uploaded. The same applies to every image and stylesheet your pages link to.
An old index file will keep winning. Web servers look for default documents in a set order, and index.html is normally checked before index.php. If you upload a new PHP site into a folder that still contains an old index.html, visitors carry on seeing the old page. Delete or rename the file you no longer want.
Placeholder pages need replacing, not adding to. A new hosting account often ships with a default holding page. Uploading your own index.html alongside it usually replaces it, and FileZilla will prompt you to confirm the overwrite. If your own file is named differently, remove the placeholder so it stops being served.
Leave the transfer type on automatic. FileZilla decides per file extension whether to transfer as text or as binary, and its defaults are correct. Forcing ASCII mode on images, fonts, PDFs or archives corrupts them in transit, producing files that upload without error and then refuse to open.
Overwrite prompts are worth reading. When a file already exists, FileZilla shows both versions with their sizes and dates so you can choose. Be careful with Always use this action, because it applies to every remaining file in the queue and is an easy way to overwrite work you meant to keep.
Permissions are not carried over. Uploaded files inherit server defaults rather than whatever permissions they had on your computer. The normal targets are 644 for files and 755 for directories. If something is unreadable to visitors, right-click it in the right pane, choose File permissions and set it there.
Many small files are slow over FTP. Each file costs a round trip, so a few thousand small files can take far longer than a single large one of the same total size. For a full site migration, compress the site locally, upload the single archive, and extract it with the file manager in your control panel.
Troubleshooting
Symptom: the upload succeeds but the site still shows the old page. Hard refresh the browser first, then check that you uploaded into the web root of the correct domain and that no older default document is still present in that folder.
Symptom: 553 Could not create file or 550 Permission denied. The FTP user cannot write to that folder. Confirm you are inside a directory the user owns, and check whether your account is out of disk space, which produces the same error.
Symptom: the browser shows 403 Forbidden or an empty directory listing after uploading. There is no valid default document in the folder, or the file permissions are too restrictive. Confirm the file is named index.html or index.php in lowercase, and set it to 644.
Symptom: transfers stall at 100 percent, or the connection drops partway through a large batch. This is usually a passive mode or firewall issue. In the Site Manager, open the Transfer Settings tab and set Transfer mode to Passive, then reset and requeue the failed transfers.
Symptom: uploaded images or archives are corrupt and will not open. The file was transferred in ASCII mode. Go to Transfer then Transfer type and set it back to Auto, then upload the affected files again.
Symptom: .htaccess uploaded but appears to be missing. It is hidden by default. Enable Server then Force showing hidden files to display it.
Related Articles
- How to Install FileZilla on Windows
- How to Connect to Your FTP Account Using FileZilla
- How to Create or Delete a Directory Using FileZilla
- How to Download Files and Directories to Your Computer via FileZilla
Need a Hand?
If your files are on the server but the site still is not loading as expected, open a ticket from your Noiz client area with your domain name, the exact path you uploaded to, and the filename of your homepage. The Noiz support team can confirm the web root for your account and check the server-side permissions for you.






