FileZilla is a free, open source FTP client that lets you move files between your computer and your Noiz hosting account without using a web-based file manager. This guide shows you how to connect it to your hosting account, how to force an encrypted connection instead of plain FTP, and how to read the errors FileZilla gives you when a connection fails.
The steps below apply to any Noiz hosting account, whichever control panel your account uses. FTP is a server-level service, so the connection details come from your hosting account rather than from any particular panel screen.
Last reviewed: 27 July 2026, against FileZilla Client 3.x (current stable series). This guide is written for Noiz hosting and is kept current against FileZilla. It complements, and does not replace, the official FileZilla documentation linked below.
Official Documentation Reference
- FileZilla Client Tutorial: the vendor walkthrough of the interface and first connection.
- Using FileZilla: Site Manager, transfer queue, and directory comparison.
- FileZilla Network Configuration: active versus passive mode, firewalls, and router behaviour.
- FileZilla Client downloads: official builds only.
Prerequisites
- FileZilla Client installed on your computer. See How to Install Filezilla Client on Windows.
- An active FTP account on your hosting service, along with its username and password.
- The hostname to connect to, which is either your domain name or the server hostname shown in your Noiz welcome email.
Gather Your FTP Connection Details
Every FTP connection needs four pieces of information. Collect them before you open FileZilla so you are not guessing at the prompt.
- Host:
ftp.yourdomain.comoryourdomain.com, replacingyourdomain.comwith your own domain. If your domain is not yet pointed at Noiz nameservers, that hostname will not resolve to the right server, so use the server hostname from your welcome email instead. - Username: the FTP username created in your hosting control panel. On most platforms this is either the main hosting account username or a separate FTP user in the form
[email protected]. - Password: the password set for that FTP user. This is not your Noiz client area password, and it is not your email password.
- Port:
21for FTP and FTPS. Leave the Port field empty and FileZilla uses21automatically. Port22is SFTP, which is a different protocol carried over SSH.
If you do not have an FTP user yet, create one in your control panel first. The exact screen differs by platform, so search the Noiz knowledgebase for "create an FTP account" and follow the article that matches the panel your account uses.
Connect Using Quick Connect
Quick Connect is the fastest way to test that your details work. It is best treated as a test rather than as your everyday method, for the reasons explained in the next section.
- Open the FileZilla Client.
- Enter your FTP host, username and password in the Quick Connect bar across the top of the window. Leave Port blank unless Noiz has given you a specific port.

- Click Quickconnect. The connection takes a few seconds. Watch the message log in the top pane: a successful login ends with a directory listing rather than an error.
- Your local computer files appear in the left pane and your hosting account files appear in the right pane.
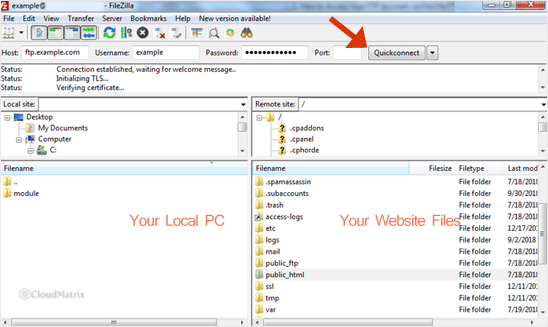
You can now browse, upload, download and delete files by dragging between the two panes.
Use Explicit FTP Over TLS Instead of Plain FTP
Plain FTP sends your username and password across the network in clear text. Anyone able to observe the connection, which matters most on shared office networks, hotel networks and public Wi-Fi, can read those credentials. Noiz recommends that you always connect over explicit FTP with TLS, usually written as FTPS.
Quick Connect will opportunistically upgrade to TLS when the server offers it, but it silently falls back to an unencrypted session when the negotiation fails. That silent fallback is the problem. Setting the connection up in the Site Manager lets you require encryption, so a failed negotiation produces an error instead of an insecure login.
- In FileZilla, open File then Site Manager.
- Click New site and give it a recognisable name, such as your domain.
- Set Protocol to FTP (File Transfer Protocol).
- Enter your Host and leave Port blank.
- Set Encryption to Require explicit FTP over TLS.
- Set Logon Type to Ask for password if you would rather not store the password on disk, or Normal if you are on a machine only you use.
- Enter your User and, if applicable, your password, then click Connect.
The first time you connect, FileZilla shows the server certificate and asks you to confirm it. Tick Always trust this certificate in future sessions and click OK. You will not be asked again for that server unless the certificate changes.
If your hosting account offers SSH access, choose SFTP (SSH File Transfer Protocol) as the protocol instead. SFTP is encrypted by default, uses port 22, and needs no separate TLS setting.
Know Where to Put Your Files
When you log in, FileZilla usually drops you into the home directory of the FTP user, not into the folder your website is served from. Files placed in the home directory will not appear on your site.
Look in the right pane for the web root folder, commonly named public_html, httpdocs or web depending on the platform your account runs on, and open it before uploading. Anything intended to be publicly visible belongs inside that folder. Your homepage, for example, belongs there as index.html or index.php.
If the FTP user was created and scoped to a single site, the web root may already be the folder you land in. In that case the right pane shows your existing site files immediately after login.
Troubleshooting
Symptom: 530 Login authentication failed or 530 Login incorrect. The username or password is wrong, or you are using client area or email credentials. Reset the FTP user's password in your control panel and try again. Also check for a trailing space if you pasted the password.
Symptom: ECONNREFUSED (Connection refused by server). Nothing is listening on the port you asked for. Confirm you left the Port field blank or set it to 21, and confirm you did not select SFTP for an account without SSH access.
Symptom: ETIMEDOUT (Connection attempt timed out). Either the hostname resolves to the wrong place or your network blocks outbound FTP. Try the server hostname from your welcome email rather than your domain, and test from a different network such as a mobile hotspot. Corporate and school networks frequently block port 21 outright.
Symptom: login succeeds but the directory listing never completes, or it fails with Failed to retrieve directory listing. This is nearly always a passive mode or firewall issue. In the Site Manager, open the Transfer Settings tab and set Transfer mode to Passive. If it still stalls, check that your local firewall or security software is not filtering FileZilla.
Symptom: Connection closed by server shortly after a period of inactivity. FTP sessions time out by design. Reconnect and, for long transfers, keep the queue running rather than leaving the window idle.
Symptom: transfers fail partway through with permission errors. Check that you are inside a folder the FTP user owns. An FTP user scoped to one site cannot write outside its own directory tree.
Related Articles
- How to Install Filezilla Client on Windows
- How to Create or Delete a Directory Using FileZilla
- How to Upload the Index File to Your Website via FileZilla
- How to Download Files and Directories to Your Computer via FileZilla
Need a Hand?
If the connection still fails after working through the troubleshooting steps, open a ticket from your Noiz client area and include the full FileZilla message log from the top pane. That log names the exact stage the connection failed at, which lets the Noiz support team confirm the server side and point you at the fix quickly.






