Your VPS hostname is the server's own name on the network, and it is separate from any website domain the server hosts. This guide shows you how to change it from the Virtualizor end user panel on your Noiz VPS, and covers the two things that catch people out afterwards: the VPS needs a power cycle before the new name is fully in effect, and mail delivery depends on the hostname matching the reverse DNS record for the VPS IP address.
Last reviewed: 27 July 2026, against the current Virtualizor release and its end user panel. This guide is written for Noiz hosting and is kept current against Virtualizor. It complements, and does not replace, the official Virtualizor documentation linked below.
Official Documentation Reference
- Virtualizor documentation: Change Hostname (end user panel)
- Virtualizor documentation: Manage VPS
- Virtualizor documentation: List VPS
Prerequisites
- Access to your Virtualizor end user panel. See How to Log In to the Virtualizor VPS Control Panel.
- A hostname you have already decided on, in fully qualified form, for example
server1.yourdomain.com(replace with your own domain). - A maintenance window. The change is not live until the VPS is stopped and started again, so treat it as a short planned outage rather than an in-hours tweak.
Choose the Hostname Before You Change It
Virtualizor accepts a fully qualified domain name: letters, digits and hyphens, separated by dots, with no underscores and no trailing dot. Two conventions save trouble later:
- Use a subdomain, not your main domain. Naming the server
server1.yourdomain.comrather thanyourdomain.comkeeps the machine name independent of the websites it hosts, so you can move sites between servers without the server identity following them around. - Create a DNS record for it first. Add an A record for the new hostname pointing at the VPS IP address. Plenty of software, mail daemons in particular, will resolve the hostname at start-up and complain loudly if it does not resolve to the machine it is running on.
Change the Hostname in Virtualizor
Step 1: Open the VPS list
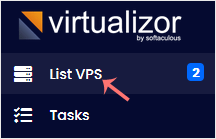
Log in to your Virtualizor end user panel, then click List VPS in the left side panel.
Step 2: Manage the VPS
Hover your mouse over the row for the VPS you want to change. The row highlights. Click the Manage icon on that row to open the VPS management page.

Step 3: Set the new hostname
On the VPS management page, open the hostname option. In the current end user panel it is listed as Hostname on the VPS management menu; on older builds it sits under a Settings tab as Change Hostname, which is what the screenshot below shows. Either way, type the new fully qualified hostname into the field and click Change Hostname.
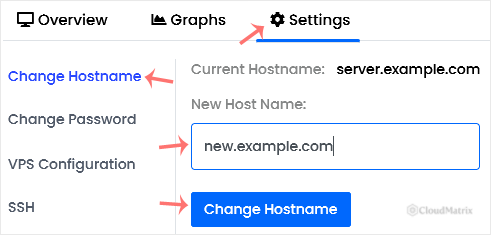
Virtualizor confirms the change straight away, but at this point only the panel's record has been updated.
Step 4: Power cycle the VPS
The hostname is applied to the running system at boot, so the VPS has to be restarted before the new name takes full effect. Virtualizor's own documentation asks for a stop followed by a start rather than a warm reboot, because a full power cycle is what guarantees the VPS picks up the new configuration from the host.
- How to Force or Gracefully Shut Down a VPS in Virtualizor, then How to Start or Boot Your VPS in Virtualizor.
- A restart from the panel is often enough on its own: see How to Reboot or Restart a VPS in Virtualizor. If the old name is still showing afterwards, do the full stop and start.
Step 5: Confirm it inside the VPS
Connect over SSH once the VPS is back up and check what the operating system now reports:
hostname -f
hostnamectl status
If the old name is still returned, set it at the operating system level as well and reboot once more:
sudo hostnamectl set-hostname server1.yourdomain.comAlso check that /etc/hosts maps the VPS IP address to both the fully qualified hostname and the short name. A stale entry there is a common cause of slow logins and of software that insists the hostname cannot be resolved.
Update Reverse DNS and Mail Settings
Changing the hostname in Virtualizor changes the server's name. It does not change how the rest of the internet identifies your IP address, and that gap is where mail problems start.
- Reverse DNS (PTR). The PTR record for your VPS IP address is set at the network level, not inside the VPS, so it does not follow a hostname change. Open a ticket with Noiz support with the IP address and the new hostname, and the PTR record will be updated to match.
- Forward and reverse must agree. Receiving mail servers routinely check that the hostname a server announces in its SMTP greeting resolves to the connecting IP address, and that the IP address resolves back to that same hostname. If the two disagree, your mail gets deferred, filed as spam, or rejected outright. Getting the A record and the PTR record to match is not optional if the VPS sends mail.
- Mail software keeps its own copy. A mail server stores the name it announces in its own configuration. After a hostname change, restart the mail service and confirm the greeting is correct, for example with
openssl s_client -starttls smtp -connect localhost:25or by reading the first line of a test SMTP session. - Server control panels keep their own copy too. If you run control panel software on the VPS, change the hostname in that panel's own settings as well. Panels issue TLS certificates and generate configuration against the hostname they hold, not the one Virtualizor holds, and the two drifting apart causes certificate warnings on the panel login page.
Troubleshooting
- Symptom: the form rejects the value. The hostname must be a valid fully qualified domain name. Remove underscores, spaces and any trailing dot, and make sure there is at least one dot in the name.
- Symptom: the panel shows the new hostname but the VPS still reports the old one. The power cycle has not happened, or the operating system is setting the hostname itself at boot. Stop and start the VPS, then set it with
hostnamectl set-hostnameif it still reverts. - Symptom: the hostname reverts on every reboot. A cloud-init or template configuration inside the VPS is overwriting it. Set
preserve_hostname: truein the cloud-init configuration inside the VPS, then set the hostname once more. - Symptom: outgoing mail is suddenly rejected or marked as spam after the change. The PTR record still points at the old hostname. Raise a ticket with Noiz support to have reverse DNS updated, and confirm the A record for the new hostname points at the VPS IP address.
- Symptom: services are slow to start or log warnings about resolving the hostname. Add the VPS IP address, the fully qualified hostname and the short name to
/etc/hosts.
Need a Hand?
Reverse DNS for a Noiz VPS is handled by the Noiz team, so open a support ticket from your Noiz client area with the VPS IP address and the new hostname and it will be aligned for you. If you are on a managed plan, Noiz can carry out the whole hostname change, including the power cycle and the mail server checks, in an agreed maintenance window.






