A Certificate Signing Request (CSR) is the block of encoded text a Certificate Authority (CA) asks for when you buy an SSL/TLS certificate. It carries your domain name and organisation details, and it is mathematically tied to a private key that stays on the server. This guide shows you how to generate a CSR in cPanel on your Noiz hosting account, and explains the details that most often cause a CA to reject a request.
Last reviewed: 27 July 2026, against cPanel & WHM version 134 (current release tier). This guide is written for Noiz hosting and is kept current against cPanel. It complements, and does not replace, the official cPanel documentation linked below.
Official Documentation Reference
- cPanel Documentation: SSL/TLS interface, including the Private Keys, Certificate Signing Requests and Certificates sections.
- cPanel Documentation: SSL/TLS Wizard, for purchasing and installing a certificate from inside cPanel.
- cPanel Documentation: SSL/TLS Status, the interface that reports AutoSSL coverage per domain.
Do You Actually Need a CSR?
Most Noiz-hosted sites never need one. cPanel issues and renews free domain-validated certificates automatically through AutoSSL, and those certificates are generated for you with no CSR involved. Before you start, check whether your site is already covered: see How to Install an SSL on Your Domain Using AutoSSL in cPanel.
Generate a CSR manually when one of the following applies:
- You are buying a commercial certificate from a specific CA, for example an organisation-validated (OV) or extended-validation (EV) certificate that shows your registered company details.
- You need a wildcard certificate covering
*.yourdomain.com. - You are reissuing or renewing an existing purchased certificate and the CA has asked for a fresh CSR.
- You need a self-signed certificate for a staging or internal service.
Prerequisites
- A cPanel hosting account with Noiz, and your cPanel login details from the welcome email or the Noiz client area.
- The domain name the certificate must cover, already pointed at the account.
- Your exact registered organisation details if you are buying an OV or EV certificate. The CA verifies these against public records, so they must match.
- The SSL/TLS feature enabled on your package. It is enabled on standard Noiz cPanel packages; if the icon is missing, open a support ticket.
Step 1: Open the SSL/TLS Interface
- Log in to cPanel.
- In the Security section, click SSL/TLS.

On some cPanel builds this opens as a tab inside a combined SSL/TLS Certificates screen rather than as a standalone page. The sections and buttons are identical either way.
Step 2: Open the Certificate Signing Requests Section
Under Certificate Signing Requests (CSR), click Generate, view, or delete SSL certificate signing requests. Older cPanel versions labelled this link Generate, View or Delete CSR, and the screenshot below reflects that wording; the position on the page has not changed.
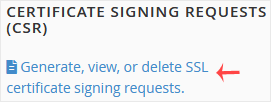
The page that opens has two parts: a Certificate Signing Requests on Server table listing any requests you have already made, and a Generate a New Certificate Signing Request (CSR) form below it.
Step 3: Choose the Private Key
Current cPanel versions start the form with a Key menu, because a CSR can only be created against a private key. You have two options:
- Select an existing key if you already generated one under Private Keys (KEY), for example when reissuing a certificate that must keep the same key.
- Select a key type to generate a new key, which is the normal choice for a first-time certificate. RSA 2,048-bit is the safest default for compatibility. ECDSA keys are smaller and faster, but confirm your CA supports them before you commit.
The account-wide default comes from the Default SSL/TLS Key Type setting on the main SSL/TLS page, so changing that changes what this menu pre-selects.
The private key never leaves the server and is never sent to the CA. Keep this in mind: if you later delete that key, or generate the CSR on one server and buy the certificate for another, the issued certificate cannot be installed. Generate the CSR on the server where the certificate will live.
Step 4: Complete the CSR Details
Fill in the fields below the Key menu:
- Domains: the fully qualified hostname the certificate must secure, such as
www.yourdomain.com(replace this with your own domain). For a wildcard certificate enter*.yourdomain.com. Everything the certificate must cover has to be listed before you generate, because names cannot be added to a CSR afterwards. - City: the full city name, for example
Cape Town. Do not abbreviate. - State: the full province or state name, for example
Western CapeorGauteng. CAs routinely reject two-letter abbreviations here. - Country: choose from the drop-down menu, which supplies the correct two-letter ISO code (
ZAfor South Africa). Typing a country name into this field is one of the most common causes of a rejected request. - Company: your registered organisation name, exactly as it appears on your company registration. If the certificate is not for a business, enter your own legal name.
- Company Division: the department or unit, for example
IT. Optional for most certificate types. - Email: an address you can receive mail on, since some CAs use it for validation messages.
- Passphrase: optional. This is the challenge password embedded in the request, not a password protecting your private key. Most CAs ignore it and a few reject requests that contain one, so leaving it blank is usually the safer choice. If you do set one, keep it short and use letters and numbers only.
- Description: a label for your own reference, so you can identify this request later in the table.
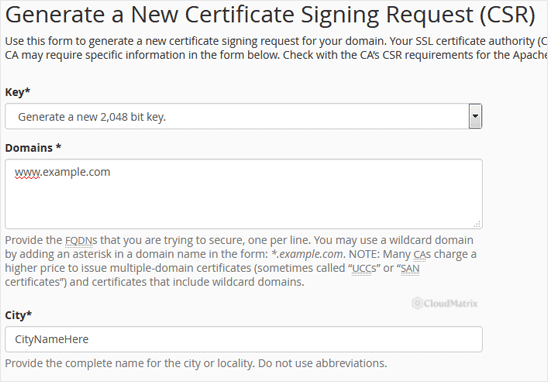
Use plain characters throughout. Ampersands, accented letters and punctuation in the company or city fields frequently fail CA validation, so write Smith and Sons rather than Smith & Sons unless the CA has told you otherwise.
A note on www: most CAs issue a certificate for www.yourdomain.com that also covers the bare yourdomain.com as a Subject Alternative Name, but that is the CA's policy rather than something cPanel controls. Confirm the coverage on the order page before you pay.
Step 5: Generate and Save the CSR
- Click Generate.
- cPanel displays the encoded request. Copy the entire block, including the
-----BEGIN CERTIFICATE REQUEST-----and-----END CERTIFICATE REQUEST-----lines and every character between them. - Paste it into a plain text file and keep it somewhere safe. You will need it when placing the order, and again if the CA asks you to reissue the certificate.
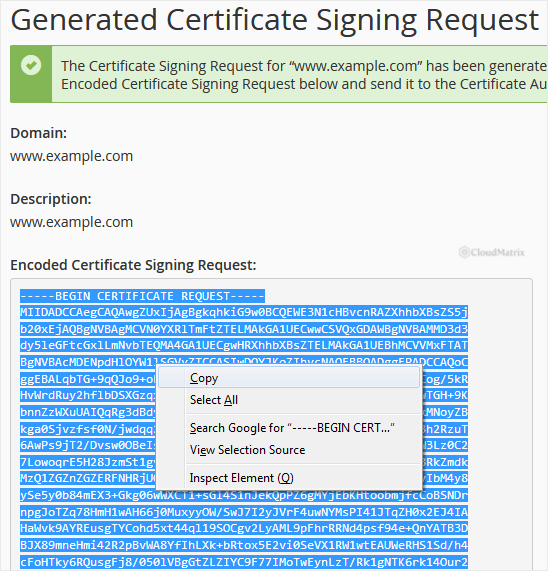
The request stays saved in your account, so you do not need to regenerate it if you close the page. To fetch it again later, see How to Retrieve a CSR from cPanel. To clear out requests you no longer need, see How to Remove a CSR Code in cPanel.
What Happens Next
Submit the CSR to your chosen CA and complete their validation, which for a domain-validated certificate usually means answering an email or publishing a DNS or file-based token. The CA then returns a signed certificate, plus a CA bundle or intermediate chain.
Install the result from the same SSL/TLS page, under Install and Manage SSL for your site (HTTPS). Because cPanel already holds the matching private key, it fills that field in for you once you select the domain.
Troubleshooting
Symptom: the form will not let you generate, or no key is available. You must have a private key first. Return to the SSL/TLS page, open Private Keys (KEY), generate one, then start the CSR again.
Symptom: the CA rejects the CSR for an invalid country or state. Re-select the country from the drop-down rather than typing it, and write the province or state name in full.
Symptom: the CSR contains the wrong domain or wrong organisation details. A CSR cannot be edited after generation. Delete it and create a new one with the corrected values, then supply the new CSR to the CA.
Symptom: the CA reports that it is not authorised to issue for your domain. A CAA record in your DNS zone restricts which CAs may issue certificates for that name. Check the zone in cPanel under Domains > Zone Editor and either remove the conflicting CAA record or add one naming your chosen CA. If no CAA records exist at all, any CA may issue, and this error points elsewhere.
Symptom: the issued certificate will not install and cPanel reports a key mismatch. The certificate was signed against a different CSR or private key than the one on this server. Retrieve the original private key, or generate a fresh CSR and ask the CA to reissue.
Symptom: the certificate installs but browsers still warn. The intermediate chain is usually missing. Reinstall the certificate with the CA bundle the CA supplied alongside it.
Need a Hand?
Certificate purchases fail on small details far more often than on anything technical, so if a CA has bounced your request and the reason is not obvious, send Noiz support the exact error alongside your domain name. If your site only needs standard HTTPS rather than a branded or wildcard certificate, ask Noiz support to confirm AutoSSL coverage first, since that route needs no CSR and renews itself.






