An MX record (short for mail exchanger record) is the DNS record that tells the rest of the internet which server accepts email for your domain. When somebody sends a message to [email protected], their mail server looks up the MX records for yourdomain.com and hands the message to the host named there. No MX record, or a wrong one, and inbound mail either bounces or lands somewhere you never look.
This guide shows you how to add an MX record in cPanel's Zone Editor, and covers the two things that decide whether the change actually takes effect: whether cPanel is serving your live DNS at all, and how cPanel routes mail for the domain internally. You may also see this task described as adding a mail exchanger record, an MX entry or pointing your domain at a mail provider. They all mean the same thing. In older cPanel releases MX records had their own MX Entry interface; that tool was retired and its job moved into Zone Editor.
Last reviewed: 27 July 2026, against cPanel & WHM 136 (current RELEASE tier). This guide is written for Noiz hosting and is kept current against cPanel. It complements, and does not replace, the official cPanel documentation linked below.
Official Documentation Reference
- Zone Editor: the reference for every button and field on the screen used below, including the Manage Zone view.
- Email Routing: what Local, Backup and Remote Mail Exchanger actually do, in cPanel's own words.
- Email Deliverability: the SPF, DKIM and PTR checks you should run after changing where your mail lives.
- RFC 5321, section 5.1: the standard that defines how a sending server resolves MX records, and why an MX must not point at a CNAME or an IP address.
- RFC 7505 (Null MX): the correct way to declare that a domain receives no mail at all.
Prerequisites
- Login details for the cPanel account that holds the domain.
- The mail server hostnames supplied by your mail provider, together with the priority number for each one. A provider will normally give you something like
mx1.mailprovider.exampleat priority10andmx2.mailprovider.exampleat priority20. Use the values in front of you, not the examples in this article. - Confirmation that this server is the one answering DNS queries for the domain. The next section shows you how to check.
- The Zone Editor icon visible in cPanel. If it is missing, the feature has been switched off for the hosting package rather than removed from cPanel.
First, Check You Are Editing the Live Zone
This one check prevents the most common wasted afternoon. cPanel edits the zone file held on the server cPanel is running on. If the domain's nameservers point anywhere else, that zone file is never consulted, and the record you add will look perfectly correct while changing nothing at all.
Look up the domain's current nameservers before you touch anything. From a terminal:
dig NS yourdomain.com +shortCompare the answer with the nameservers cPanel shows you under Domains > Zone Editor, or in the General Information panel on the cPanel home screen. If they do not match, the domain's DNS is being served by your registrar, a CDN, or a separate DNS platform, and that is where the MX record belongs. Editing it in cPanel as well is harmless but pointless, and it leaves a stale copy that confuses whoever looks next.
Two related traps are worth knowing about:
- A domain proxied through a CDN or a third-party DNS service keeps its DNS there permanently, not just during setup. MX records for such a domain are always edited at that service.
- If the domain is an addon domain, an alias or a subdomain on the account, make sure you pick the right entry in the Zone Editor list. Adding an MX to
yourdomain.comdoes nothing for mail addressed tomail.otherdomain.com.
Add the MX Record
- Log in to your cPanel account.
- In the Domains section, click Zone Editor.

- Zone Editor lists every domain on the account. Each row carries a set of quick actions: + A Record, + CNAME Record, + MX Record, DNSSEC and Manage. The quick actions add one record type without leaving the list; Manage opens the full record table for that domain, where you can see and filter everything the zone already contains.
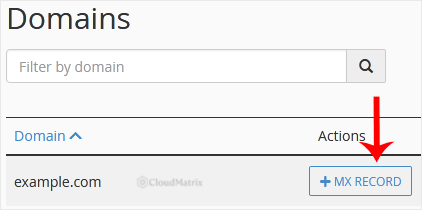
- Before adding anything, click Manage and filter the table by MX to see which MX records already exist. Almost every cPanel account is created with an MX record pointing at itself, and leaving that in place alongside a new external record is the single biggest cause of mail going missing after a migration.
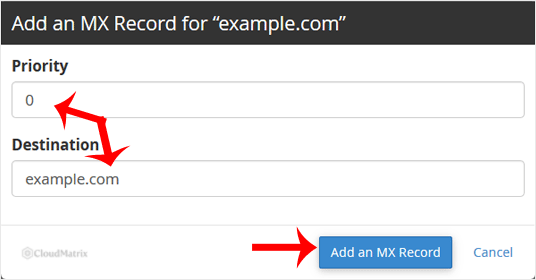
- Click + MX Record beside the domain. A small form opens with two fields.
- Priority: a whole number that sets the order in which sending servers try your mail hosts. The lowest number wins. A value of
0is the highest priority available. Enter exactly the number your mail provider specifies. - Destination: the fully qualified hostname of the mail server, for example
mx1.mailprovider.example. This must be a hostname that resolves to an IP address. It must not be an IP address itself, must not point at a CNAME, and must not include a protocol, a port or a trailing slash. cPanel adds the trailing dot for you.
- Priority: a whole number that sets the order in which sending servers try your mail hosts. The lowest number wins. A value of
- Click Add an MX Record. A success message confirms the record has been written to the zone.
- Repeat for every mail host your provider lists. Most providers publish two or more, and a domain with only the first of them has no fallback if that host is unreachable.
The new records now appear in the Manage table for the domain. To change or delete one later, see How to Edit or Remove an MX Record in cPanel. The same Zone Editor screen handles the other common record types: A records and CNAME records.
How Priority Actually Works
Priority is the field people most often get backwards, because the intuitive reading is wrong. It is a preference number, not a score, so a lower value means a more preferred server.
A sending server collects every MX record for the domain, sorts them by priority ascending, and tries the lowest first. If that host refuses the connection or times out, it moves on to the next. A typical two-host set looks like this:
10 mx1.mailprovider.example: tried first, handles all mail under normal conditions.20 mx2.mailprovider.example: tried only when the first host cannot be reached.
Points worth knowing:
- The actual numbers carry no meaning of their own, only their order relative to each other.
10and20behave identically to1and2. Conventional spacing of 10 simply leaves room to insert a host later without renumbering everything. - Two records sharing the same priority are treated as equals, and sending servers spread traffic across them. Use this deliberately for load sharing, never by accident.
- A backup MX only helps if that host is genuinely configured to queue and forward your mail. An unconfigured backup MX is worse than none, because it accepts messages and then has nowhere to send them.
- Never run MX records for two different mail providers side by side while you decide. Mail will split unpredictably between them and neither mailbox will hold the full picture.
Tell cPanel Where to Deliver Local Mail
This step is not optional when you are moving mail to an external provider, and it is missing from most MX guides. cPanel does not work out your intentions from the zone file alone.
The server keeps a separate routing decision for each domain it hosts. If that decision still says the server itself handles the mail, then anything sent from an account on that same server to your domain is delivered into a local mailbox and never leaves the machine. Externally the change looks perfect; internally, half your mail quietly disappears. Contact form messages from your own website are the classic casualty.
- Go to Email > Email Routing in cPanel.
- Select the domain from the list.
- Choose the correct setting:
- Automatically Detect Configuration: the sensible default. The server reads the MX records in the zone and routes accordingly.
- Local Mail Exchanger: the server always accepts mail for the domain and delivers it to local mailboxes. Correct when mailboxes live on this server, including when an external filtering or gateway service sits in front of it.
- Backup Mail Exchanger: the server queues mail and holds it until a lower-numbered mail exchanger is reachable again.
- Remote Mail Exchanger: the server refuses to deliver locally and forwards everything to the lowest-numbered mail exchanger. This is what you want when mailboxes now live with an external provider.
- Click Change.
Automatic detection only reads the local zone file, and it does not perform a live DNS lookup. So if you have added an external MX but left the original self-pointing MX in place, automatic detection sees a local mail exchanger and keeps mail on the server. Remove the old record first, then set routing.
One more consequence to plan for: once routing is remote, any cPanel mailbox for that domain stops receiving new mail, but the messages already in it stay on the server. Export or forward anything you still need before you cut over, because turning the domain remote does not migrate a single message for you.
Do Not Stop at the MX Record
Moving where mail is received usually means moving where mail is sent from too, and the sending side has its own records. If you change MX and nothing else, your outbound mail starts failing authentication checks at the recipient and lands in spam folders.
- SPF: update the TXT record so it authorises the new provider's sending servers, and remove any provider you no longer use. Publish exactly one SPF record for the domain.
- DKIM: publish the selector record your new provider gives you. This is normally a TXT or CNAME record at a name such as
selector1._domainkey. - DMARC: a TXT record at
_dmarc.yourdomain.com. Start atp=nonewith reporting enabled, read the reports for a week or two, and only then tighten the policy. - Autodiscover and autoconfig: many providers ask for CNAME or SRV records so that mail clients configure themselves. Skipping these does not break mail, but it does mean every user has to type server settings by hand.
cPanel's Email > Email Deliverability screen will report on SPF and DKIM for domains it still handles, which makes it a useful sanity check before and after a move.
Propagation and TTL
An MX change is not instant, and the delay is governed by the TTL (time to live) on the records, not by any fixed waiting period. Resolvers that already have your old MX cached keep using it until that cache entry expires.
- Typical zone TTLs run from 5 minutes to 4 hours. Allow up to 24 hours for the last stragglers, particularly resolvers that ignore short TTLs.
- If the move is planned, lower the TTL on the existing MX records to
300seconds at least a day beforehand, using Manage in Zone Editor. Cut over, confirm it works, then put the TTL back to something sensible such as3600. - Leave the old mailboxes reachable for a few days after the switch. Mail that was already queued for the old server will still be delivered there.
To check what the world currently sees, rather than what your own machine has cached:
dig MX yourdomain.com @1.1.1.1 +shortThe output lists each priority and hostname. If it still shows the old values, the record has either not been written or has not yet expired from cache.
Troubleshooting
Symptom: the record saved without error, but dig still returns the old MX. Either the TTL has not expired yet, or the domain's DNS is not served by this server. Re-run the nameserver check at the top of this article before changing anything else.
Symptom: mail from outside arrives at the new provider, but messages sent from your own website or from another account on the same server never turn up. Email Routing is still set to Local Mail Exchanger, or a self-pointing MX record was left in the zone. Fix both, in that order.
Symptom: cPanel rejects the destination as invalid. You have entered an IP address, a URL, or a hostname with a trailing slash. The destination must be a bare fully qualified hostname that resolves to an A or AAAA record.
Symptom: senders receive "550 relay not permitted" or "no such user here" from a server you have just moved away from. The MX has moved but the old server still believes it owns the domain. Set that domain to Remote Mail Exchanger, or remove the domain from it entirely once the migration is complete.
Symptom: mail loops back and forth and eventually bounces with a message about too many hops. Two servers each believe the other is responsible. This is almost always an MX pointing at a host that has itself been configured to forward to the same domain.
Symptom: the + MX Record button is missing from Zone Editor. The Email Routing (MX Records and Zone Editor) feature is disabled on the hosting package. Contact your provider to have it enabled rather than editing zone files by hand.
Symptom: you want a domain to receive no mail at all, for example a domain used only for redirects. The correct approach is a null MX as defined in RFC 7505: a single record with priority 0 and a destination of . (a lone dot). Zone Editor's quick-add form may refuse the bare dot, in which case use Manage to add the record, or ask Noiz support to place it for you. Deleting all MX records is not equivalent, because senders then fall back to the domain's A record and try to deliver mail to your web server.
Getting Help
If your Noiz hosting account uses a different control panel, the record itself is identical and only the screen you type it into changes. The priority and destination values from your mail provider apply exactly as written here.
Changing MX records affects live mail delivery, and a mistake usually shows up as messages that silently go somewhere else rather than as an obvious error. If you are migrating a busy domain, are unsure which records to remove, or have already made the change and mail has stopped arriving, contact Noiz support with the domain name and the details your mail provider gave you. The team will check the zone, the routing and the authentication records together, and can carry out the cutover for you.






