Removing a post in WordPress is a two-stage job, and most people only ever do the first stage. Sending a post to the Trash takes it off your live site immediately but keeps it recoverable; emptying the Trash destroys it for good. This guide shows you how to remove a single published or draft post on a WordPress site hosted with Noiz, how to get one back when you change your mind, and the three things that catch people out afterwards: the media that stays behind, the URL that starts returning a 404, and the cached copy that keeps serving for a while.
If you need to clear out many posts in one go, use How to Bulk Delete Posts in WordPress instead. This article covers the single post case.
Last reviewed: 27 July 2026, against WordPress 7.0.2 (latest stable). The Trash workflow described here has been part of WordPress core since version 2.9 and behaves the same in the block editor and the classic editor. This guide is written for Noiz hosting and is kept current against WordPress. It complements, and does not replace, the official WordPress documentation linked below.
Official Documentation Reference
- Posts Screen for the full list of row actions on the All Posts list.
- Trash for how the recycle bin works and what it retains.
- Roles and Capabilities for which user roles are allowed to delete which posts.
- wp-config.php: EMPTY_TRASH_DAYS if you want to change or disable the 30 day Trash retention.
Prerequisites
- Access to your WordPress admin dashboard at
https://yourdomain.com/wp-admin, replacingyourdomain.comwith your own domain. - A user account with permission to delete the post. An Administrator or Editor can delete anybody's posts. An Author can delete their own posts, published or not. A Contributor can only delete their own posts while they are still drafts or pending review.
- A recent backup if the post matters. Trash gives you a 30 day grace period by default, but that only helps if you notice the mistake inside 30 days.
Send a Post to the Trash
- Log in to your WordPress dashboard.
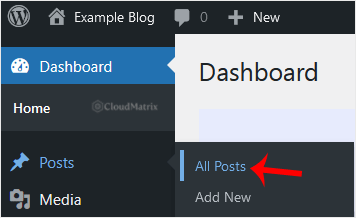
- In the left-hand menu, go to Posts and click All Posts.
- Find the post you want to remove. Hover your mouse over its title. A row of small links appears underneath it: Edit, Quick Edit, Trash and View. These only appear on hover, which is why they are easy to miss.
- Click Trash.
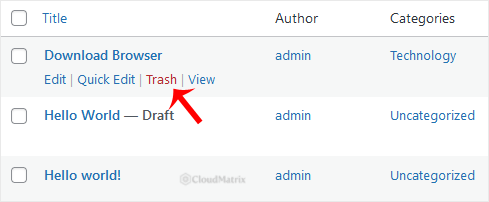
WordPress reloads the list and shows a confirmation at the top of the screen reading 1 post moved to the Trash. Undo. The post disappears from your live site straight away.
That Undo link is the fastest way to reverse a mistake, but it is only good for as long as you stay on that page. Reload or navigate away and it is gone, and you will need to restore the post from the Trash instead.
Trashing a Post From Inside the Editor
If you already have the post open, you do not need to go back to the list. In the block editor, open the Post tab in the right-hand settings sidebar and click Move to trash at the bottom of the panel. In the classic editor, the Move to Trash link sits in the Publish box on the right. Either way the post is trashed immediately, with no confirmation prompt.
Restore a Post From the Trash
- Go to Posts and then All Posts.
- Click the Trash link in the row of filters above the list. It only appears when there is something in the Trash, and the number in brackets tells you how many posts are in there.
- Hover over the post you want back and click Restore.
A restored post returns with its original content, categories, tags, featured image, comments and permalink intact. What does not always come back is its published status: WordPress restores posts to Draft in many cases, so check the post and republish it if it needs to be live again.
Delete a Post Permanently
Emptying the Trash is irreversible. There is no second recycle bin and no undo, so the only route back after this point is a backup restore.
- Go to Posts, then All Posts, then click the Trash filter.
- To destroy one post, hover over it and click Delete Permanently.
- To destroy everything in the Trash at once, click Empty Trash.
Permanently deleting a post also removes its comments, its revision history and its custom fields. It does not remove anything from the Media Library.
You usually do not need to do this at all. WordPress empties the Trash by itself: any post that has been sitting in there for more than 30 days is deleted automatically the next time the site's scheduled tasks run.
Changing or Disabling the 30 Day Trash
The retention period is set in wp-config.php. To shorten it to seven days, add this line above the /* That's all, stop editing! */ comment:
define( 'EMPTY_TRASH_DAYS', 7 );Setting the value to 0 switches the Trash off entirely. Every Trash link in the admin turns into Delete Permanently, and a single mis-click destroys a post with no way back. Noiz does not recommend it on any site with more than one author.
What Happens After a Post Is Gone
Its Media Stays in the Library
Deleting a post never deletes the images, PDFs or videos that were uploaded to it. They remain in Media and, more to the point, they remain publicly reachable at their direct file URL, for example https://yourdomain.com/wp-content/uploads/2026/03/report.pdf. If the post was removed because its contents were confidential or wrong, go to Media and delete the attachments as well. Nothing about removing the post hides them.
Its URL Starts Returning 404
The moment a post is trashed, its address becomes a 404 Not Found for anyone following an old link, a bookmark or a search result. If the post had traffic or inbound links, that is a real loss and worth handling deliberately:
- Redirect it to the nearest equivalent page with a 301, using a redirection plugin or a rule in your site configuration. This is the right answer when the content moved or was replaced.
- Set it to Private or Draft instead of deleting it. Editing the post and changing its visibility to Private takes it off the public site while keeping it, the URL and the history available to logged in editors. This is often the better choice for content you are only removing because it is out of date.
- Leave it as a 404 if the post was junk, spam or a test. Search engines will drop it from the index on their own over the following weeks.
A Cached Copy May Keep Serving
If your site uses a caching plugin, or sits behind a CDN, the deleted post can carry on being served to visitors from the cache after it has left WordPress. Most caching plugins clear the relevant pages automatically when a post changes, but the site's home page, category archives and any CDN copy often lag. If the post is still visible on the live site after you trashed it, purge the site cache and the CDN cache, then check again in a private browsing window.
Troubleshooting
Symptom: there is no Trash link when you hover over the post. Your user role does not have permission to delete that post. Contributors cannot delete a post once it has been published, and Authors cannot delete posts written by other people. Ask an Administrator or Editor on the site to remove it, or have your role changed.
Symptom: the row actions read Delete Permanently instead of Trash. The Trash has been disabled on the site with define( 'EMPTY_TRASH_DAYS', 0 ); in wp-config.php. Anything you click there is destroyed immediately with no recovery. Change the value to a positive number of days to get the safety net back.
Symptom: there is no Trash filter above the posts list. The Trash is empty, so WordPress hides the link. It reappears as soon as something is in there.
Symptom: the post is still on the live site after being trashed. This is nearly always caching. Purge your caching plugin and your CDN, then reload in a private window. If it survives that, confirm you trashed the post rather than a copy of it, and check whether the content is also duplicated in a widget, a page builder template or a static home page.
Symptom: Are you sure you want to do this? appears when you click Trash. The security token on the page expired because the admin screen had been open for a long time. Go back, reload the posts list, and click Trash again.
Symptom: trashed posts keep coming back, or the Trash never empties itself. The site's scheduled task runner is not firing, which also affects scheduled publishing, backups and update checks. See How to Disable wp-cron.php and Use a System Cron in WordPress.
Related Articles
- How to Bulk Delete Posts in WordPress for clearing out several posts at once.
- How to Remove Sample Comments and Posts From WordPress for tidying up a fresh installation.
- How to Write and Publish Your First Blog Post in WordPress for creating posts in the first place.
- How to Manage WordPress Categories the Right Way for keeping the rest of your content organised.
Getting Help
If you have permanently deleted a post you needed, stop working on the site and open a ticket in the Noiz client area straight away, quoting the domain, the post title and roughly when it was deleted. On managed plans the Noiz team can check whether a backup taken before the deletion still holds the post, and the sooner you ask the more likely that is. Continuing to publish and edit in the meantime makes a clean restore harder.






