Deleting posts one at a time is fine for a handful. When you are clearing out a demo site, stripping an imported blog back to its useful articles, or wiping hundreds of spam or scraped posts left behind by a compromised plugin, you need the bulk route. This guide shows you how to move many WordPress posts to the Trash at once, how to permanently remove them afterwards, and the two traps that catch most people: the "select all" checkbox that quietly only selects the current page, and the fact that deleting a post does not delete the images that were attached to it.
Last reviewed: 27 July 2026, against WordPress 7.0.2 (latest stable). This guide is written for Noiz hosting and is kept current against WordPress. It complements, and does not replace, the official WordPress documentation linked below.
Official Documentation Reference
- Posts Screen for the full reference on the post list, its filters and its bulk actions.
- Administration Screens for how Screen Options and the list tables behave across the dashboard.
- Editing wp-config.php for the
EMPTY_TRASH_DAYSconstant that controls how long trashed posts are kept. - WordPress Backups if you want the background on why a snapshot before a mass deletion is not optional.
Prerequisites
- Access to the WordPress dashboard as an Administrator or Editor. Authors can only bulk delete their own posts, and Contributors cannot delete published posts at all. If you cannot get in, see How to login to WordPress (Admin Dashboard).
- A current backup of the site database. Bulk deletion is fast, silent and irreversible once the Trash is emptied.
- A clear idea of which posts are going. Deleting only one post? Use How to Remove a Post in WordPress instead.
Take a Backup First
There is no undo for an emptied Trash. WordPress does not ask you to confirm a bulk action either: the moment you click Apply, every selected post moves, no dialogue, no second chance. Take a full backup of the site files and database before you start.
Noiz hosting accounts include scheduled backups, and you can trigger an on demand snapshot from your hosting control panel before a big clear out. Doing that takes a minute and turns an irreversible mistake into a restore.
Move Posts to the Trash in Bulk
Deleting a post in WordPress is a two stage process. The first stage moves posts to the Trash, where they are hidden from the site but still recoverable. The second stage empties the Trash and removes them from the database for good. This section covers stage one.
- Log in to the WordPress dashboard at
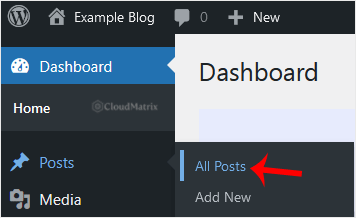
https://yourdomain.com/wp-admin/, replacingyourdomain.comwith your own domain. - In the left hand menu, go to Posts and click All Posts.
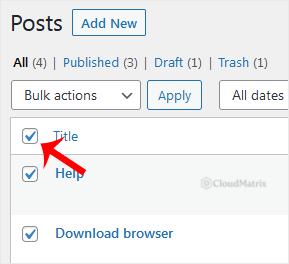
- Tick the checkbox in the header row of the table, immediately to the left of the Title column. That selects every post currently shown on the page. To select only some posts, leave that one alone and tick the individual checkboxes instead.
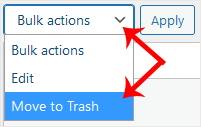
- Open the Bulk actions dropdown above the list, choose Move to Trash, and click Apply.
WordPress reloads the list and shows a notice along the lines of "24 posts moved to the Trash", with an Undo link next to it. That Undo link only survives until you navigate away or reload, so if you have just made a mistake, click it now rather than reading on.
The Bulk actions dropdown and the Apply button appear twice, once above the list and once below it. They do the same thing. If your list is long, the pair at the bottom saves a scroll.
The Select All Trap
This is the single most common surprise. The header checkbox selects everything on the current page, not everything in your blog. WordPress shows 20 posts per page by default, so on a site with 800 posts you have selected 20 and left 780 behind, and the confirmation message reading "20 posts moved to the Trash" is easy to skim past.
To handle a larger batch in one pass:
- Click Screen Options at the top right of the Posts screen.
- Set Number of items per page to a higher figure, then click Apply.
- Tick the header checkbox again. It now covers everything on the enlarged page.
Do not simply type a huge number here. Every post on the page is rendered by PHP and then processed in a single request when you apply the bulk action, so an extreme value can exhaust the PHP memory limit or run past the maximum execution time and hand you a blank page or a 500 error part way through the deletion. Around 100 to 200 items per page is a sensible working figure on standard hosting. Repeat the pass a few times rather than trying to clear thousands in one request.
Delete Only a Subset of Posts
Trashing everything is rarely what you actually want. Narrow the list first, then select all, and the header checkbox becomes precise instead of dangerous. The controls sit directly above the post list:
- Status links along the top (All, Published, Drafts, Pending, Trash) filter by post state. Clearing out abandoned drafts without touching anything live starts here.
- All dates filters to a single month. Useful when a plugin or an import injected posts on a known date.
- All Categories filters to one category. Pair this with How to Manage WordPress Categories the Right Way if the categories themselves need tidying afterwards.
- The Search posts box matches on title and content, which is the fastest way to isolate injected spam that shares a recurring phrase or link.
- Clicking the Author name in a row filters to that author, which is how you clear out everything a departed contributor or a rogue account published.
Apply a filter, confirm the count shown next to the status links looks right, then select all and apply Move to Trash. The filter stays applied when the page reloads, so you can work through page after page of the same filtered set.
Permanently Delete the Posts
Posts in the Trash are still rows in your database. They no longer appear on the site, but they still count towards database size, and they are still recoverable, which may or may not be what you want.
- On the Posts screen, click the Trash link in the row of status links at the top. It only appears when there is something in the Trash.
- Click Empty Trash to permanently remove everything listed, or tick individual posts and choose Delete permanently from the Bulk actions dropdown to remove only those.
To recover something instead, hover over the post and click Restore. A restored post returns as a draft, not as a published post, so check its status and republish it if it was live.
Left alone, WordPress empties the Trash automatically after 30 days. That interval is set by the EMPTY_TRASH_DAYS constant in wp-config.php. Raising it gives you a longer safety net; setting it to 0 disables the Trash entirely, which means every delete becomes immediate and permanent. Setting it to 0 is a bad idea on any site with more than one editor.
What Bulk Deleting Does Not Remove
This is where a "clean" site turns out not to be clean at all.
- Images and other media stay behind. WordPress treats attachments as their own post type, so deleting a post leaves every image, PDF and video it used sitting in the Media Library and on disk, still consuming your hosting quota. Clearing those out is a separate job: see How to Clean Up Your WordPress Media Library.
- Old URLs start returning 404. Anything indexed by a search engine or linked from elsewhere now leads nowhere. If the deleted posts had traffic or inbound links, set up 301 redirects to the closest surviving page rather than leaving a field of dead ends.
- Categories and tags survive as empty terms. They will show a post count of zero and can still appear in menus, widgets and archive pages. Delete the ones you no longer need.
- Comments follow the post. Comments attached to a trashed post go to the Trash with it and are permanently removed with it. There is no way to keep them.
- The database does not shrink on its own. Deleted rows leave gaps in the tables. A large clear out is a good moment to run an optimise pass on the database from your hosting control panel or phpMyAdmin.
- Revisions go too. Every stored revision of a deleted post is removed with it, which is usually the point, but worth knowing if you were relying on revision history.
Clearing Out Hundreds or Thousands of Posts
The bulk action runs as a single PHP request. Every selected post has to be updated, its comments moved, its terms recounted and its caches cleared before the page can respond, so the work grows with the size of the selection rather than staying flat. Push it too far and PHP hits its time or memory limit mid job, leaving some posts trashed and some not, and returning a white screen or a 500 error with no useful message.
The reliable approach is boring and works every time:
- Set Screen Options to 100 or 200 items per page rather than the maximum.
- Run the bulk action, wait for the confirmation notice, then repeat.
- Emptying the Trash is the same kind of operation, so empty it in batches too instead of clearing 5,000 posts in one click.
- If a batch times out, reload the Posts screen before trying again and check what actually went through. Do not assume the whole batch failed.
If you are dealing with tens of thousands of posts, that is a database level job rather than a dashboard one, and running it as SQL against the correct tables and their relationship tables is safer than hammering the admin screen. Open a ticket and the Noiz team will handle it.
Troubleshooting
Symptom: only 20 posts were deleted when you meant to delete all of them. The header checkbox selects the current page only. Raise Number of items per page in Screen Options, or repeat the bulk action page by page.
Symptom: Move to Trash is missing from the Bulk actions dropdown. Your account does not have the capability to delete those posts. Authors can only delete their own, and Contributors cannot delete published posts. Sign in as an Administrator or ask one to run it.
Symptom: nothing happens when you click Apply. Either no posts are selected, or Bulk actions is still on its default entry rather than Move to Trash. Both are easy to miss because WordPress reloads the page either way without an error.
Symptom: a blank page, a 500 error or a gateway timeout part way through a large deletion. The request exceeded the PHP execution time or memory limit. Reduce the batch size and try again. If it keeps happening on modest batches, a plugin is doing extra work on every post deletion, so deactivate plugins one at a time to find it.
Symptom: the Trash link is not shown at all. Either the Trash is empty, or EMPTY_TRASH_DAYS has been set to 0 in wp-config.php, which disables the Trash and makes every deletion immediate.
Symptom: posts reappear after you delete them. Something is recreating them. The usual culprits are an active import or feed importer plugin, a syncing service, or malicious code left behind after a compromise. Deleting the posts again will not fix it. Find and stop the source first.
Symptom: the site is slow or unreachable straight after a mass deletion. Term counts, sitemaps and caches are all being rebuilt. Give it a few minutes, then clear any page cache and regenerate the sitemap from your SEO plugin.
Getting Help
If a bulk deletion has gone wrong, stop and do not run anything else. Open a ticket in the Noiz client area with the site domain, roughly how many posts were involved and the exact error text if there was one. On managed plans the Noiz team can restore from backup, run large deletions directly against the database where the dashboard cannot cope, and check whether posts that keep reappearing are the symptom of something worse than an untidy blog.






