Writing your first blog post is one of the more satisfying moments in setting up a new website. This guide walks you through creating, categorising, tagging and publishing a post in the WordPress block editor on your Noiz hosting account, and explains the two or three small things that catch first-time authors out.
Last reviewed: 27 July 2026, against WordPress 7.0.2 (latest stable). This guide is written for Noiz hosting and is kept current against WordPress. It complements, and does not replace, the official WordPress documentation linked below.
Official Documentation Reference
- WordPress Block Editor (the editing workspace and top toolbar)
- Page/Post Settings sidebar (Categories, Tags, Excerpt, Featured image, Status)
- Posts Categories screen
- Posts Tags screen
- Editor Preferences overview (including the pre-publish checklist)
Prerequisites
- A WordPress site installed on your Noiz hosting account.
- An account on that site with the Author, Editor or Administrator role. Contributors can write posts but cannot publish them.
- Your WordPress dashboard sign-in details. If you are not sure how to get in, see How to log in to WordPress (Admin Dashboard).
The screenshots below show the standard WordPress admin. The WordPress 7.0 admin refresh changed some colours and spacing, but the menu names, panels and steps are the same.
Write and Publish the Post
- Log in to your WordPress dashboard at
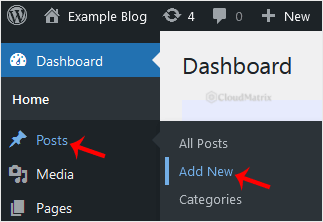
yourdomain.com/wp-admin(replaceyourdomain.comwith your own domain). - In the left-hand menu, go to Posts and click Add New. Depending on your WordPress version this item may read Add New Post.
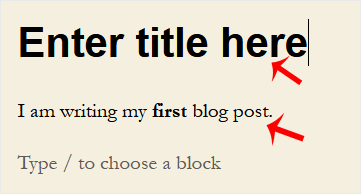
- Enter your post title in the Add title field at the top, then click below it and start writing. Each paragraph, heading, image or list you add is a separate block. Press
Enterto start a new block, or click the + button to choose a specific block type such as Image or Heading.
- Open the settings sidebar if it is not already showing: click the Settings (gear) icon in the top-right of the editor, then select the Post tab.
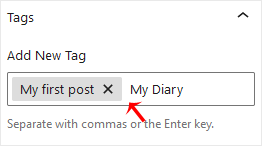
- Expand Tags, type a tag into the Add New Tag box and press
Enter. Repeat for each tag you want. Existing tags autocomplete as you type, so you reuse them rather than creating near-duplicates.
- Expand Categories and tick the category the post belongs to. To create one on the spot, click Add New Category, type the name, optionally pick a parent category, then click the Add New Category button. If you tick nothing, WordPress files the post under Uncategorized.
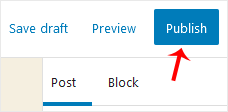
- Click Publish in the top-right of the editor. WordPress then shows a confirmation panel headed Are you ready to publish?, listing the visibility, publish date, categories and tags. Check them and click Publish again to make the post live.
- Click View Post in the confirmation message to see the published post on your site.
Why Publish Takes Two Clicks
The second click is not a glitch. It is the pre-publish checklist, a deliberate safety step that gives you one last look at visibility, schedule, categories and tags before anything goes public. It is the single most common point of confusion for new authors, who click Publish once, see a panel appear, and assume the post is already live.
If you would rather publish in one click, open the three-dot Options menu in the top-right, choose Preferences, and under General switch off Include pre-publish checklist. On a site with more than one author, Noiz suggests leaving it switched on. Recovering an accidentally published draft is far more work than one extra click.
Categories and Tags: What the Difference Is
Both group your posts, but they are not interchangeable, and getting this right from your very first post saves a messy clean-up later.
- Categories are the broad sections of your site, like chapters in a book. Every post gets one, and a post should usually sit in a single category. They can be nested under a parent. Keep the list short: five to ten categories suits most sites.
- Tags are specific keywords describing what a post mentions, like an index at the back of a book. They are optional, flat (no hierarchy), and a post can carry several.
The mistake to avoid is creating a tag that is used exactly once. Every tag generates its own archive page, so a pile of single-use tags produces a pile of near-empty pages that dilute your site rather than help anyone find anything. A useful test: if you cannot imagine writing three more posts that would carry the same tag, do not create it.
For more on structuring these properly, see How to Add a New Category in WordPress and How to Manage WordPress Categories the Right Way.
Worth Setting Before You Publish
These live in the same Post tab of the settings sidebar and take seconds, but they are awkward to fix afterwards:
- Slug: the last part of the post URL. WordPress builds it from your title, so a long title becomes a long, ugly link. Shorten it to a few keywords before you publish. Changing a slug after publishing breaks any link already shared to that post.
- Featured image: most themes use this as the thumbnail on your blog index and in social media previews. Without one, your post often looks blank when shared.
- Excerpt: a one or two sentence summary. If you leave it empty, WordPress uses the first 55 words of the post, which rarely reads like a proper summary.
- Publish date: click the date under Publish to schedule the post for a future date and time instead of publishing immediately.
Use the View or preview button in the top toolbar to check how the post looks on desktop, tablet and mobile before you commit.
Troubleshooting
There is no Publish button, only Submit for Review: your user account has the Contributor role, which can write but not publish. Ask a site administrator to publish the post or to raise your role to Author.
The post is published but does not appear on the front page: check the Status setting is Published and not Private or Password protected, confirm the publish date is not set in the future, and check under Settings > Reading that your front page is set to show your latest posts rather than a static page.
Publishing fails with an "Updating failed" or "publishing failed" message: this is almost always the connection to the site dropping mid-save, or a security plugin or firewall blocking the editor's requests. Your text is not lost. Copy your content out, reload the editor and try again. If it keeps happening, deactivate plugins one at a time to find the culprit.
You lost work when the browser closed: WordPress autosaves drafts as you type. Reopen the post and look for the revisions notice near the top of the settings sidebar to restore an earlier version.
The editor looks unfamiliar or blocks are missing: a plugin such as Classic Editor may be active, replacing the block editor. Check Plugins for anything editor-related and deactivate it if you want the block editor back. For getting faster in the block editor, see How to Use the WordPress Block Editor Efficiently.
Need a Hand?
Congratulations on your first blog post. If something in the editor is not behaving as described here, or you are on a Noiz managed hosting plan and would like the site checked over, open a support ticket from your Noiz client area and the support team will take a look.






