phpMyAdmin is the web-based manager for MySQL and MariaDB databases that ships with every Noiz hosting control panel. Its Repair table operation rebuilds a table's index and data files after they have been left in an inconsistent state, which is the standard fix for a site throwing errors such as "Table is marked as crashed and should be repaired". This guide shows you how to run it, and just as importantly, how to tell whether it will do anything at all for your database.
The single most useful thing to know before you start: Repair table only works on MyISAM tables (and the rarely used ARCHIVE and CSV engines). Modern databases almost always use InnoDB, and InnoDB does not support this operation. Running Repair on an InnoDB table is harmless but pointless, and it will simply report that the storage engine does not support repair. The section below on identifying your storage engine tells you which situation you are in before you spend time on it.
Last reviewed: 27 July 2026, against phpMyAdmin 5.2.3 (latest stable, released 8 October 2025), MySQL 8.4 LTS and MariaDB 11.4 LTS. This guide is written for Noiz hosting and is kept current against phpMyAdmin. It complements, and does not replace, the official phpMyAdmin and MySQL documentation linked below.
Official Documentation Reference
- phpMyAdmin User Guide (docs.phpmyadmin.net)
- MySQL 8.4 Reference: REPAIR TABLE statement
- MySQL 8.4 Reference: CHECK TABLE statement
- MariaDB Knowledge Base: REPAIR TABLE
- MySQL 8.4 Reference: Forcing InnoDB Recovery (for genuinely corrupt InnoDB data)
Prerequisites
- Access to your hosting control panel (your Noiz welcome email contains the login details).
- The name of the database the application actually uses. For WordPress this is the
DB_NAMEvalue inwp-config.php. - A current backup, or a few minutes to take one in step 2 below. A repair rebuilds files in place, and in a small number of cases it discards rows it cannot recover.
Step 1: Open phpMyAdmin
phpMyAdmin is reached from your control panel, so you are already authenticated and do not need to enter database credentials separately. Depending on which Noiz platform your account sits on, the route differs slightly, but the destination is the same application:
- Plesk: open Databases, find the database in the list, then click phpMyAdmin next to it.
- DirectAdmin: open Account Manager or Databases, then click the phpMyAdmin link.
- ISPConfig: open Sites, then Database, and use the phpMyAdmin link on the database entry.
- Any other panel: look for a Databases section, then the phpMyAdmin entry inside it.
The screenshots below were taken on an older panel build, but every step from the moment phpMyAdmin opens is identical on all of them.

Step 2: Back Up the Database First
A repair is a rebuild, not an undo. If the table is badly damaged, the rebuild can drop the rows it cannot make sense of, and there is no way to get them back afterwards.
In phpMyAdmin, select the database in the left sidebar, click the Export tab at the top, leave the export method on Quick with the format set to SQL, and click Export. The .sql file downloads to your computer. Keep it until you have confirmed the site is working again.
If the table is so damaged that the export itself fails, stop and contact the Noiz support team rather than repairing blind. A server-side copy of the raw database files taken before any repair gives you far more options than a failed export does.
Step 3: Expand the Database in the Navigation Tree
The left sidebar lists every database your account can reach. Click the arrow beside the database name (or the name itself) to expand it and reveal its tables.
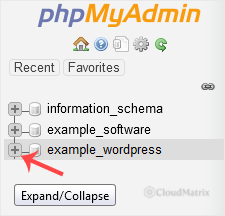
If more than one database is listed, pick carefully. A single hosting account often holds databases for several sites, plus leftovers from old installs. For WordPress, the correct one is the value of DB_NAME in the site's wp-config.php file, which you can open in File Manager.
Step 4: Check Which Storage Engine the Tables Use
With the database selected, the main panel lists every table with its row count, Type (the storage engine), collation and size. Look at the Type column before you do anything else:
- MyISAM, ARCHIVE or CSV: Repair table applies, and the rest of this guide is what you want.
- InnoDB: Repair table does not apply. Skip to the InnoDB section below.
Mixed databases are common on older sites, particularly ones that have been migrated between hosts over the years. You may find a handful of legacy MyISAM tables sitting alongside InnoDB ones in the same database.
If you want to confirm damage rather than assume it, select the tables and choose Check table from the same drop-down used in step 5. A healthy table returns OK. A damaged one returns a message such as Table is marked as crashed, which tells you a repair is genuinely warranted rather than a guess.
Step 5: Select the Tables and Run Repair
Scroll to the bottom of the table list and click Check All to select every table, or tick only the specific tables you want if you have already identified them. Then open the With selected: drop-down beneath the list and choose Repair table.
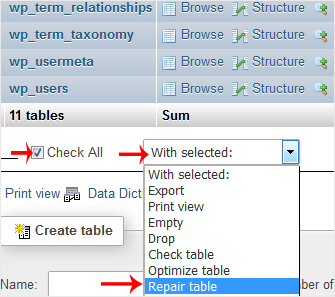
phpMyAdmin runs the operation immediately, with no confirmation prompt, and returns a results grid listing every table it touched.
Step 6: Read the Results
Each row in the results grid shows the table name, the operation, a message type and the message itself:
- status / OK: the table is fine, either because it was never damaged or because the repair succeeded.
- note / The storage engine for the table doesn't support repair: an InnoDB (or similar) table. This is expected and is not an error. See the next section.
- warning followed by a row count: the repair completed but discarded rows it could not recover. Compare the count against your backup to see what was lost.
- error: the repair could not complete. Note the exact wording and move to the troubleshooting section.
Reload the affected site afterwards. An OK from a repair means the table structure is now consistent, which is not quite the same as the application working again, so verify the actual symptom has gone.
If Your Tables Are InnoDB
InnoDB has been the default engine since MySQL 5.5, so unless the database is genuinely old or was created by an application that insists on MyISAM, this is what you will be looking at. InnoDB has no equivalent of the MyISAM repair, and it does not need one in normal operation, because it keeps a write-ahead log and replays it automatically the next time the database service starts. A power cut or an unclean shutdown is repaired without anyone asking it to.
Three practical points follow from that:
- Running Repair table on InnoDB does nothing and harms nothing. You get a note back, and the table is untouched. There is no need to avoid it out of caution.
- What you probably want is
OPTIMIZE TABLE. If your actual complaint is a bloated or slow table rather than a crashed one, the Optimize table option in the same drop-down rebuilds the table and reclaims space. On InnoDB, phpMyAdmin maps it to a rebuild that achieves the same result. - Genuine InnoDB corruption is a server-level job. Recovering it involves the
innodb_force_recoverysetting in the server configuration, which cannot be reached from phpMyAdmin and is not available to hosting accounts. If you are seeing InnoDB corruption errors in your site logs, raise a ticket with the Noiz support team and include the exact error text.
When a Repair Is and Is Not the Answer
Repair fixes damage to the table's own files. It cannot fix problems that live in the data itself.
A repair is the right tool when you see errors naming a specific table, such as "Table './dbname/wp_options' is marked as crashed and should be repaired", "Incorrect key file for table", or "Can't open file: 'wp_posts.MYI'". These follow an unclean shutdown, a disk that filled up, or a process killed mid-write.
A repair will not help when the site is slow, a plugin is misbehaving, a login fails, content has been deleted, or the database connection is refused outright. Those are application, permission or configuration problems. Repeatedly repairing a healthy table in the hope that something changes only costs you time.
If the same table keeps crashing after being repaired, treat that as a signal rather than a nuisance. Recurring MyISAM corruption usually points to the disk filling up, the database service being killed under memory pressure, or a table large enough to be running into MyISAM's limits. In every one of those cases the durable fix is converting the table to InnoDB, which tolerates unclean shutdowns by design.
Converting a Repeatedly Crashing Table to InnoDB
If a MyISAM table crashes more than once, converting it is usually the better answer than repairing it again. Take an export first, then open the SQL tab and run:
ALTER TABLE wp_options ENGINE=InnoDB;Replace wp_options with your own table name. Convert one table at a time and test the site in between. A small number of older applications rely on MyISAM behaviour such as full-text search on legacy MySQL versions, so check the application's requirements before converting everything in the database.
Troubleshooting
Symptom: The result says "The storage engine for the table doesn't support repair". The table is InnoDB. This is not a failure. See the InnoDB section above.
Symptom: The repair returns an error mentioning a temporary file or disk space. The repair needs room to build a new copy of the table alongside the original, so a table close to your disk quota cannot be repaired until you free space. Clear old backups, logs and cache directories, then try again.
Symptom: The repair reports "Table is in use" or appears to hang. Another process is writing to the table. Put the site into maintenance mode, or stop whatever cron job or import is running, then retry.
Symptom: The repair reports lost rows. Open your export from step 2, find the rows that are missing, and reinsert only those. Reimporting the entire file over a repaired table risks bringing the damage back with it.
Symptom: The page times out on a large table. Repairs on multi-gigabyte tables can outlast the web request. Run it on one table at a time rather than using Check All, and if it still times out, raise a ticket so the operation can be run directly on the server without a browser timeout in the way.
Symptom: The site still shows a database error after a successful repair. The error is coming from something other than table damage. Check the exact error text in the site's log: a connection error points at credentials or the database service, whereas a missing table or column points at an incomplete update or migration.
Related Guides
- How to Export a Database in phpMyAdmin
- How to Import a Database in phpMyAdmin
- How to Edit a Database Table in phpMyAdmin
Need a hand?
A crashed database table on a live site is stressful, and the wrong move at that point can turn a recoverable problem into a restore. If you are on a managed Noiz plan, or you are unsure whether repairing is safe with the data you have, contact the Noiz support team through the client area with the exact error text and the database name, and the team will take it from there.






