phpMyAdmin is the web-based MySQL and MariaDB manager included with your Noiz hosting account. Importing a database means running an .sql dump file against an existing database so that its tables and data are recreated on the server. This is how you restore a backup, move a site from another host, or push a copy of a development database up to live.
This guide applies to any Noiz hosting plan that gives you phpMyAdmin. You open it from your hosting control panel (Plesk on the South African platform, DirectAdmin on the Irish platform), or from the database section of whichever panel your plan provides. The phpMyAdmin steps themselves are identical in every panel.
Last reviewed: 27 July 2026, against phpMyAdmin 5.2.3 (latest stable, released October 2025). This guide is written for Noiz hosting and is kept current against phpMyAdmin. It complements, and does not replace, the official phpMyAdmin documentation linked below.
Official Documentation Reference
- phpMyAdmin: Import and export
- phpMyAdmin FAQ: I cannot upload big dump files (memory, HTTP or timeout problems)
- MySQL Reference Manual: mysqldump (how dump files are produced)
Prerequisites
- The
.sqldump file you want to import, saved on your computer. A compressed dump (.sql.gz,.sql.zip,.sql.bz2) works too and does not need unpacking first. - A database already created on the server to import into. phpMyAdmin imports into a database; it does not normally create one for you. Create the database in your hosting control panel first if it does not exist yet.
- The exact name of that database. On shared hosting the panel usually prefixes database names with your account name, so a database you called
shopmay actually beexample_shopon the server.
Before You Import: Read This First
An import is not a preview. It executes every statement in the file against the database you have selected, and there is no undo button.
- Export the target database first. Even if you believe it is empty, take a dump before you import. It costs thirty seconds and it is the only thing that will save you if the wrong database was selected.
- Import into an empty database wherever possible. Most dumps produced by
mysqldumpincludeDROP TABLE IF EXISTSstatements, so they replace tables cleanly. Dumps that only containINSERTstatements do not, and running one on top of existing data produces duplicate key errors or silently doubles up rows. - Check which database is selected before you click Import. phpMyAdmin shows the target in the page heading, for example
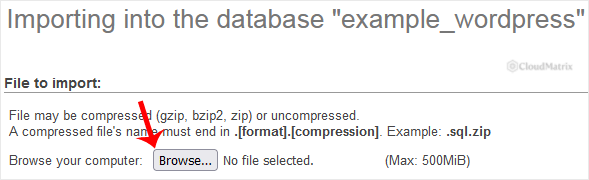
Importing into the database "example_wordpress". If that heading says Server: localhost instead of naming a database, no database is selected and the import will fail or land in the wrong place.
Import the SQL File
1. Log in to your hosting control panel and open phpMyAdmin from the databases area.

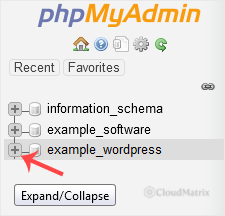
2. In the navigation tree in the left sidebar, click the database you want to import into. Ignore information_schema and any other system databases; those belong to the server, not to your account.
3. Click the Import tab in the menu bar across the top of the page.

4. In the File to import: section, find Browse your computer: and click the file chooser button (your browser labels it Browse or Choose File), then pick the .sql file from your computer. The maximum accepted file size is printed next to the button, for example (Max: 500MiB). You can also drag the file onto the page instead of using the file picker.
5. Leave Character set of the file at utf-8 unless you know the dump was created in another encoding. Getting this wrong is one of the few import mistakes that is genuinely hard to reverse, because it corrupts accented and non-Latin characters as they are written.
6. Leave the remaining defaults alone for a standard restore, then scroll to the bottom and click the Import button.
7. Wait for the page to finish. Large files can take several minutes, and closing the tab or clicking away mid-import leaves the database half populated.
A green banner confirms the import finished, along with the number of queries executed and the file name.

Confirm the result rather than trusting the banner alone: the table list in the left sidebar should now show the expected tables, and clicking a couple of them should show real rows.
A note on the screenshots: these were captured on an earlier phpMyAdmin release. The page layout and the option names are unchanged, but the submit button at the bottom of the Import tab is now labelled Import rather than Go.
The Import Options Explained
You can ignore all of these for a routine restore, but they are the settings that rescue a failing import.
- Partial import → Allow the interruption of an import... Ticked by default. It lets phpMyAdmin stop just before the PHP time limit is reached and resume from where it stopped when you resubmit. Useful for large files, but it breaks transactions, so an interrupted import can leave the database in a partial state until you finish it.
- Skip this number of queries (for SQL) starting from the first one. Used with the option above. If an import times out, phpMyAdmin tells you the position it reached; enter that number here and resubmit the same file to carry on instead of starting from scratch.
- Other options → Enable foreign key checks. Ticked by default. Untick it when a dump creates tables in an order that references tables which do not exist yet, which is the usual cause of
Cannot add or update a child rowanderrno: 150errors. - Format. Leave on SQL for a database dump. The other formats (CSV, XML, OpenDocument Spreadsheet) are for loading tabular data into an existing table, not for restoring a whole database.
- Format-specific options → SQL compatibility mode. Leave on
NONE. It only matters when the dump came from a much older MySQL version and the import fails on syntax the current server no longer accepts.
When the File Is Larger Than the Upload Limit
This is the single most common reason an import will not start. If your .sql file is bigger than the maximum shown next to Browse your computer:, the upload either fails immediately or the page returns blank after a long wait.
- Compress the dump. phpMyAdmin decompresses the file on the server, so a zipped or gzipped dump only has to fit through the upload limit in its compressed form. SQL text compresses extremely well, often to a tenth of its size. The file name must end in the format followed by the compression, for example
backup.sql.ziporbackup.sql.gz. Renaming a.zipto.sqldoes not work and produces a syntax error. - Split the dump. If the compressed file is still too large, split it into several smaller
.sqlfiles and import them in order. Keep the table creation statements with the data that belongs to them. - Ask Noiz to import it server side. For very large databases the practical answer is to import from the command line, which has no upload limit and no web timeout. Upload the dump to your account by FTP or SFTP and open a support ticket telling Noiz the file path and the target database name.
Troubleshooting
- "No data was received to import. Either no file name was submitted, or the file size exceeded the maximum size permitted by your PHP configuration." The file is over the upload limit, or the upload was cut off in transit. Compress the dump and try again, or use one of the other options above.
- "#1044 Access denied for user" or "#1007 Can't create database". The dump contains
CREATE DATABASEandUSEstatements from the server it came from. Your hosting account is not permitted to create databases from SQL, and the old database name almost certainly does not match your new one. Open the dump in a plain text editor, delete those two lines from the top, and import again. - "#1062 Duplicate entry ... for key 'PRIMARY'". You are importing into a database that already holds this data. Empty the database first (or create a fresh one) and repeat the import.
- "The user specified as a definer does not exist". The dump contains views, triggers or stored routines carrying a
DEFINERclause naming a user from the original server. Edit the dump and remove eachDEFINER=`someuser`@`localhost`clause, then import again. - "Fatal error: Maximum execution time of ... seconds exceeded" or the page stops part way. The import ran out of time. Note the position phpMyAdmin reports, enter it in Skip this number of queries, and resubmit the same file to continue.
- Accented characters appear as
é,’or question marks after the import. The character set was wrong. Do not try to correct the text by hand. Drop the tables, set Character set of the file to match how the dump was actually created (usuallyutf-8, occasionallylatin1for older dumps) and import the original file again. - The import succeeded but the site still shows an error. The database is only half the job. Check that your application's configuration file points at the correct database name, database user and password on this server. For WordPress that is
wp-config.php; a restored database with the old credentials still in the config file produces "Error establishing a database connection". - A restored WordPress site loads the old domain. The site and home URLs are stored in the database. Change them with a search and replace tool that understands PHP serialised data, because a plain find and replace corrupts serialised option values and breaks widgets and theme settings.
If the import will not complete, or the database is too large to push through the browser, contact the Noiz support team and Noiz can run the import on the server for you. Please note that if you are not on a managed plan, migration and recovery work of this kind may be billable.






