phpMyAdmin is the web-based manager for MySQL and MariaDB databases that ships with every Noiz hosting control panel. It lets you open a database table, find a single row, and change one stored value directly, which is the quickest way to fix an application that will not let you change that value from its own admin area. This guide shows you how to edit a table row safely, using the WordPress wp_options table as the worked example.
Editing a database by hand is a power tool. There is no undo button and no confirmation prompt on a value change, so the backup step below is not optional.
Last reviewed: 27 July 2026, against phpMyAdmin 5.2.3 (latest stable, released 8 October 2025). This guide is written for Noiz hosting and is kept current against phpMyAdmin. It complements, and does not replace, the official phpMyAdmin documentation linked below.
Official Documentation Reference
- phpMyAdmin User Guide (docs.phpmyadmin.net)
- phpMyAdmin: Import and Export (backing up before you edit)
- WordPress Options API and the options table
- WordPress: Changing The Site URL
Prerequisites
- Access to your hosting control panel (your Noiz welcome email contains the login details).
- The name of the database the application actually uses. For WordPress this is the
DB_NAMEvalue inwp-config.php. - A current backup, or a few minutes to take one in step 2 below.
Step 1: Open phpMyAdmin
phpMyAdmin is reached from your control panel, so you are already authenticated and do not need to enter database credentials separately. Depending on which Noiz platform your account sits on, the route differs slightly, but the destination is the same application:
- Plesk: open Databases, find the database in the list, then click phpMyAdmin next to it.
- DirectAdmin: open Account Manager or Databases, then click the phpMyAdmin link.
- ISPConfig: open Sites, then Database, and use the phpMyAdmin link on the database entry.
- Any other panel: look for a Databases section, then the phpMyAdmin entry inside it.
The screenshots below were taken on an older panel build, but every step from the moment phpMyAdmin opens is identical on all of them.

Step 2: Back Up the Database First
Before changing anything, take a copy you can restore from. In phpMyAdmin, select the database in the left sidebar, click the Export tab at the top, leave the export method on Quick with the format set to SQL, and click Export. The .sql file downloads to your computer.
Keep that file until you have confirmed the site still works. Restoring it later is a matter of using the Import tab on the same database.
Step 3: Expand the Database in the Navigation Tree
The left sidebar lists every database your account can reach. Click the arrow beside the database name (or the name itself) to expand it and reveal its tables.
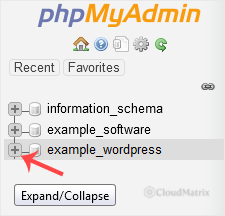
If more than one database is listed, pick carefully. A single hosting account often holds databases for several sites, plus leftovers from old installs. For WordPress, the correct one is the value of DB_NAME in the site's wp-config.php file, which you can open in File Manager.
Step 4: Select the Table You Want to Edit
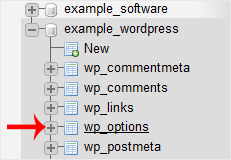
Click the table name in the sidebar, or click the table row in the main panel, to open it on the Browse tab.
For the WordPress example, the table holding site-wide settings is wp_options. Note the underscore. Note also that wp_ is only the default table prefix. Many installs use a custom prefix for security, so your table may be named something like xk4_options instead. The prefix in use is the $table_prefix value in wp-config.php.
Step 5: Find the Correct Row and Click Edit
The Browse tab shows the first 25 rows, with Edit, Copy and Delete links at the start of each row.
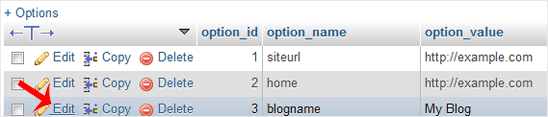
Do not rely on row position. Row order is not guaranteed and the row you want may be on a later page. Instead, use the Search tab to target the row precisely: put the column name and value you are looking for into the search form and run it. For WordPress, searching the option_name column for blogname returns the single row that holds the site title. Then click Edit on that result.
Step 6: Change the Value and Click Go
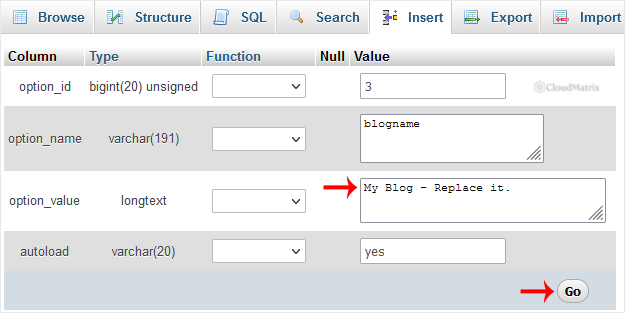
phpMyAdmin opens the row in an editable form, one field per column. Change only the field you came for, leave the primary key column alone, then click Go at the bottom of the form to write the change.
phpMyAdmin confirms with a green message and shows the UPDATE statement it ran. Reload the site in a new browser tab to confirm the change took effect.
Why This Is Useful
Editing the value directly bypasses the application's own admin area entirely, which matters when that admin area is the thing that is broken. Common cases include a theme or plugin that renders the WordPress dashboard unusable, a site URL that was changed to the wrong address and now locks you out, or a setting that refuses to save because of a caching or permissions fault. In each of those, the value in the table is the real source of truth, and changing it there is the fastest route back to a working site.
Gotchas Worth Knowing
- Serialised data breaks if you edit it by hand. Values that begin with something like
a:3:{s:5:...}are PHP serialised arrays, and the numbers are character counts. Change the text without changing the count and the application will silently discard the whole option. Never search-and-replace inside serialised values by hand. Use a tool built for it, or change the setting through the application. - Site URL changes need both rows. In WordPress,
siteurlandhomeboth live in the options table. Change one and not the other and you get redirect loops or a half-broken site. - No Edit link means no primary key. If a table has no primary or unique key, phpMyAdmin cannot identify a single row and hides the inline edit links. You will need a targeted
UPDATEstatement on the SQL tab instead, with aWHEREclause narrow enough to hit one row. - Caching can hide your change. If a page or object cache is active, the old value may keep being served. Clear the application cache, and any CDN cache, before concluding the edit did not work.
- The autoload column matters in WordPress. Leave it as you found it. Flipping it changes whether the option loads on every page request, which affects performance rather than correctness, but there is no reason to touch it while changing a value.
- Editing while the site is live is a race. On a busy site the application may overwrite your change moments later. For anything beyond a one-off fix, put the site into maintenance mode first.
Troubleshooting
Symptom: The change saves in phpMyAdmin but the site shows the old value. Clear the application, object and CDN caches, then reload with a hard refresh. If the value reverts in the database itself, a plugin or configuration file is rewriting it. For WordPress, check whether WP_HOME or WP_SITEURL are hard-coded in wp-config.php, which overrides the database.
Symptom: You get "#1062 Duplicate entry" when saving. You have edited a column covered by a unique index and the new value already exists in another row. Pick a different value, or find and resolve the existing row first.
Symptom: The site went blank or started redirecting after your edit. Restore the .sql file you exported in step 2 using the Import tab, then work out what the correct value should have been before trying again.
Symptom: You cannot see the database you expected in the sidebar. The database belongs to a different hosting account or user, or the application is connecting to a database you did not know about. Confirm the name in the application's configuration file rather than guessing from the list.
Need a hand?
Direct database edits are one of the easier ways to break a working site. If you are on a managed Noiz plan and would rather have the change made for you, or you need a database restored from backup, contact the Noiz support team through the client area and the team will assist.






