phpMyAdmin is the web-based manager for MySQL and MariaDB databases that ships with every Noiz hosting control panel. This guide shows you how to delete a single table out of a database using it, which is the usual way to clear out a table left behind by an uninstalled plugin, a failed import, or an application you no longer run.
Deleting a table in database terms is called dropping it. A drop removes the table's rows, its columns, its indexes and the table itself in one action. There is no undo, no confirmation beyond the single dialogue box, and no recycle bin. The only way back is a backup, so take one before you start.
Last reviewed: 27 July 2026, against phpMyAdmin 5.2.3 (latest stable, released 8 October 2025). This guide is written for Noiz hosting and is kept current against phpMyAdmin. It complements, and does not replace, the official phpMyAdmin documentation linked below.
Official Documentation Reference
- phpMyAdmin User Guide (docs.phpmyadmin.net)
- phpMyAdmin: Import and Export (how to take and restore the backup)
- MySQL Reference Manual: DROP TABLE statement
- MySQL Reference Manual: TRUNCATE TABLE statement
- MariaDB Knowledge Base: DROP TABLE
Prerequisites
- Access to your hosting control panel (your Noiz welcome email contains the login details).
- The name of the database the table sits in. For WordPress this is the
DB_NAMEvalue inwp-config.php. - A current backup, or a few minutes to take one in step 2 below.
- Certainty that nothing still reads from the table. If you are not certain, rename it instead of dropping it. That option is covered at the end of this guide.
Step 1: Open phpMyAdmin
phpMyAdmin is reached from your control panel, so you are already authenticated and do not need to enter database credentials separately. Depending on which Noiz platform your account sits on, the route differs slightly, but the destination is the same application:
- Plesk: open Databases, find the database in the list, then click phpMyAdmin next to it.
- DirectAdmin: open Account Manager or Databases, then click the phpMyAdmin link.
- ISPConfig: open Sites, then Database, and use the phpMyAdmin link on the database entry.
- Any other panel: look for a Databases section, then the phpMyAdmin entry inside it.
The screenshots below were taken on an older panel build, but every step from the moment phpMyAdmin opens is identical on all of them.

Step 2: Back Up the Database First
A dropped table cannot be recovered from within phpMyAdmin, so the export you take now is the entire safety net for this job. Select the database in the left sidebar, click the Export tab at the top, leave the export method on Quick with the format set to SQL, and click Export. The .sql file downloads to your computer.
If you only want the one table, open the table first and then use its own Export tab. That produces a much smaller file and is enough to put the table back exactly as it was.
Keep the file until the site or application has been tested and is behaving normally. Restoring it later is a matter of using the Import tab on the same database.
Step 3: Expand the Database in the Navigation Tree
The left sidebar lists every database your account can reach. Click the expand arrow beside the database name (or the name itself) to open it and reveal its tables.
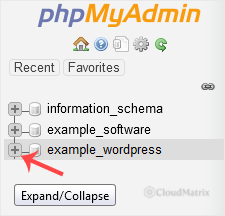
If more than one database is listed, pick carefully. A single hosting account often holds databases for several sites, plus leftovers from old installs, and table names repeat across them. For WordPress, the correct database is the value of DB_NAME in that site's wp-config.php file, which you can open in File Manager.
Step 4: Select the Table You Want to Delete
Click the table name in the sidebar, or the table row in the main panel, to open it. The worked example below uses the WordPress table wp_links.
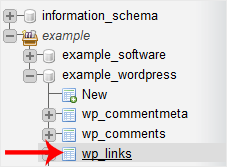
Two things to check before going further. First, wp_ is only the default WordPress table prefix, and many installs use a custom one, so your table may be named something like xk4_links instead. The prefix in use is the $table_prefix value in wp-config.php. Second, confirm the row count and glance at the Browse tab. If a table you assumed was abandoned is full of recent rows, something is still writing to it.
Step 5: Open the Operations Tab
With the table open, click Operations in the row of tabs across the top. This tab holds the table-level actions: rename, move, copy, change storage engine, and the delete options.

Step 6: Click Delete the Table (DROP)
Scroll down to the Delete data or table panel near the bottom of the page. It offers two options, and the difference between them matters:
- Empty the table (TRUNCATE) deletes every row but keeps the table, its columns and its structure. The application can carry on writing to it.
- Delete the table (DROP) removes the table completely. Nothing is left behind.
Click Delete the table (DROP), then confirm in the dialogue box that appears. phpMyAdmin runs the statement and reports success, and the table disappears from the sidebar.
Warning: the whole table is removed. Restoring it is impossible without a backup, and phpMyAdmin has no undo for this action. Make sure you have completed step 2 before you confirm.
Deleting Several Tables at Once
If you are clearing out a group of tables, for example everything a removed plugin left behind, you do not need to repeat the steps above for each one. Click the database name in the sidebar so the full table list is showing, tick the checkbox beside each table you want gone, then choose Drop from the With selected menu underneath the list. phpMyAdmin shows the full list of tables it is about to drop, which is the moment to read it carefully, then confirms.
Drop, Empty, or Rename: Choosing the Right One
Dropping is the most destructive of the three and often not what is actually needed:
- Drop when the table belongs to software you have removed and will not reinstall.
- Empty (TRUNCATE) when the application still uses the table but the contents are junk, such as a bloated log, session or transient table. The application keeps working because the table still exists.
- Rename when you are fairly sure the table is unused but want a way back. On the same Operations tab, use Rename table to and give it a name like
zz_old_wp_links. The application stops finding it, exactly as if it were deleted, but every row is still there if something breaks. Drop it a fortnight later once nothing has complained.
Gotchas Worth Knowing
- Do not drop an application's core tables. Dropping something like
wp_options,wp_postsorwp_userstakes the site down immediately. Only remove tables you can positively identify as belonging to software that is no longer installed. wp_linksis a WordPress core table, not plugin debris. It backs the old Links Manager, hidden by default since WordPress 3.5. Dropping it is usually harmless on a modern site, but WordPress or a plugin may recreate it, and any plugin that re-enables the Links Manager will error without it. It is used here as the example because it is one of the few core tables that is genuinely safe to remove.- Foreign keys can block the drop. If another table references this one through a foreign key constraint, InnoDB refuses the statement and returns an error. Remove the dependent constraint first, or drop the tables in the correct order, rather than forcing it.
- Dropping a table does not always shrink your disk usage straight away. With the usual per-table file layout the space is returned when the table file is removed, but on shared tablespaces the freed space is reused internally rather than handed back to the filesystem.
- Orphaned tables are not always safe to delete. A prefix you do not recognise may belong to a second application sharing the same database, which is common on older installs where a forum or a shop was set up alongside the main site.
- Case matters. On Linux servers, table names are case sensitive.
wp_Linksandwp_linksare different tables.
Troubleshooting
Symptom: The Operations tab is missing or the delete options are greyed out. The database user phpMyAdmin is connecting as does not hold the DROP privilege on that database. Grant the user full privileges on the database in your control panel, then reload phpMyAdmin.
Symptom: "Cannot delete or update a parent row: a foreign key constraint fails" or error #1217. Another table depends on this one. Find the referencing table, drop or alter its constraint, then retry.
Symptom: The table is gone but the site now shows a database error. Import the .sql file you exported in step 2 using the Import tab on the same database. Importing a single-table export recreates just that table and leaves the rest untouched.
Symptom: The table reappears after you delete it. The application recreated it, which means it is still in active use. Do not keep dropping it. Uninstall or disable the software that owns the table first.
Symptom: You cannot see the database you expected in the sidebar. The database belongs to a different hosting account or user, or the application connects to a database you did not know about. Confirm the name in the application's configuration file rather than guessing from the list.
Related Guides
- How to Export a Database in phpMyAdmin
- How to Import a Database in phpMyAdmin
- How to Edit a Database Table in phpMyAdmin
Need a hand?
Dropping the wrong table is one of the quickest ways to take a working site offline. If you are on a managed Noiz plan and would rather have the table identified and removed for you, or you need a database restored from backup, contact the Noiz support team through the client area and the team will assist.






