On Noiz cPanel hosting that runs CloudLinux, the Select PHP Version tool lets you turn PHP's display_errors setting on or off yourself. When it is on, PHP prints warnings, notices and fatal error messages into the page output, which is useful while you are chasing down a broken plugin or a white screen. When it is off, those messages stay out of the browser and go to the error log instead, which is where they belong on a live site.
The tool goes by several names. Select PHP Version is the cPanel icon label, PHP Selector is the CloudLinux product name, and the page you need is its Options tab. They all refer to the same place.
Read this before you switch it on: display_errors should be off on any site the public can reach. PHP error output routinely includes the absolute filesystem path of your account, the names of your database and database user, connection strings, and fragments of application code. Attackers actively look for this, because a single visible warning can hand over the exact information needed to target the site. Switch it on to reproduce a fault, then switch it straight back off.
Last reviewed: 27 July 2026, against cPanel & WHM version 134 (the stable and LTS tier in cPanel's own wording) with the Jupiter interface, and against the PHP branches the PHP project currently supports (8.2, 8.3, 8.4 and 8.5). This guide is written for Noiz hosting and is kept current against cPanel and CloudLinux. It complements, and does not replace, the official documentation linked below.
Official Documentation Reference
- CloudLinux OS Components: PHP Selector: what the Selector is, how the alt-php builds are packaged, and which settings it can and cannot change.
- PHP Manual: display_errors: the authoritative description of the directive, its accepted values, and why the manual recommends against enabling it in production.
- PHP Manual: log_errors and error_log: the settings that send the same messages to a file instead of to the browser.
- cPanel: MultiPHP INI Editor: the cPanel-native alternative that some accounts have instead of, or alongside, the CloudLinux Selector.
Prerequisites
- A Noiz cPanel hosting account and its login details.
- An account running a numbered PHP version rather than native. The Selector's Options tab is only available on the alternative PHP builds. See How to Change the PHP Version via CloudLinux Selector in cPanel if you need to switch first.
- A plan for switching it off again. Decide up front whether you are testing for five minutes or for an hour, and set yourself a reminder.
Enable or Disable display_errors
1. Open Select PHP Version
Log in to your cPanel account, scroll to the Software section, and click Select PHP Version. If the icon is not obvious, type PHP into the search box at the top of the cPanel home page.

2. Open the Options tab
On the Select PHP Version page, click Options. This tab lists the PHP directives you are allowed to change for your account, each with its current value.

Note: if the Options tab shows an error mentioning the native PHP version, your account is set to native. That build is managed by the server rather than by the Selector, so it exposes no editable options. Select a numbered PHP version first, then return to the Options tab.
3. Toggle the setting
Find display_errors in the list. Tick the box to enable it, or clear the box to disable it. The Selector saves the change as soon as you toggle it and confirms at the top of the page, so there is no separate save step and no need to restart anything.
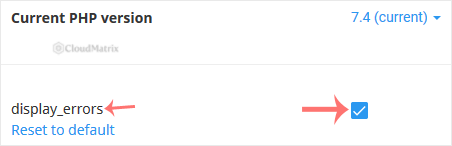
4. Confirm the change took effect
Reload the page that was failing in a fresh browser tab. If you enabled the setting and still see a blank page, work through the troubleshooting section below before assuming the toggle did not apply.
What This Setting Actually Changes
These are the points that generate the most follow-up tickets, and none of them are visible on the Options tab itself.
- It is account-wide, not per-domain. The CloudLinux Selector applies one set of options to the whole cPanel account, so every domain, subdomain and add-on domain under that account is affected together. You cannot enable error output on a staging subdomain while leaving it off on the live site in the same account.
- Options are stored per PHP version. Each PHP version keeps its own copy of these settings. If you later change the account's PHP version, the new version starts on its own defaults and your
display_errorschoice does not follow it across. That cuts both ways: a version change can silently switch error output back on, or off, without you touching this page. - It only controls where messages go, not which ones exist.
error_reportingdecides which severities PHP generates in the first place. Iferror_reportingexcludes notices and deprecations, enablingdisplay_errorswill not make them appear. Both directives are on the same Options tab. - Startup errors are separate. Errors raised while PHP itself is starting up, such as a broken extension, are governed by
display_startup_errorsrather thandisplay_errors. If you get a blank page with nothing logged, that is worth checking too. - Your application can override it. A call to
ini_set('display_errors', ...)in application code, aphp.inior.user.inifile in your document root, or a framework's own environment handling will all beat the Selector value at runtime. WordPress is the common case:WP_DEBUGandWP_DEBUG_DISPLAYinwp-config.phpcontrol error display for the whole site regardless of what you tick here.
The Safer Way to Debug a Live Site
Printing errors into the page is the blunt approach. On a site with real visitors, there is almost always a better option.
- Read the log instead of the page. Leave
display_errorsoff, make surelog_errorsis on, and read the resulting file. The same messages land there with timestamps, and nobody visiting the site sees them. - Reproduce it on a copy. If you have a staging copy of the site in a separate cPanel account, enable error output there and leave the live account untouched.
- Use your application's own debug mode where it has one. WordPress, Laravel and most modern frameworks can write a detailed error log without exposing anything publicly, and their output is usually more useful than raw PHP warnings.
- Keep the window short. If you genuinely must enable it on a live site, do it, reproduce the fault immediately, capture the message, and switch it off. Minutes, not days.
Troubleshooting
- Symptom: the Options tab shows an error about the native PHP version. The account is on the server's native PHP build, which exposes no editable options. Switch to a numbered version first.
- Symptom: display_errors is ticked but the page is still blank. Either the error is a startup error, in which case check
display_startup_errors, or the application is overriding the setting in code. Checkwp-config.phpor the framework's environment configuration, and look for aphp.inior.user.inifile in the document root. - Symptom: errors appear, then vanish again a few days later. The account's PHP version was changed, and the new version started on its own defaults. Re-check the Options tab for the version you are now running.
- Symptom: enabling it breaks an API endpoint, a login, or file downloads. This is expected. Error output written before the headers are sent produces "headers already sent" failures, and any warning printed into a JSON or file response corrupts it. Turn the setting off and read the log instead.
- Symptom: the setting will not save, or
display_errorsis not in the list. Some hosting configurations manage PHP centrally and restrict which directives an account can edit. Open a ticket with Noiz support and say which setting you need changed. - Symptom: you enabled it, saw a database credential in the output, and the site is public. Disable it immediately, then change the database password and update your application's configuration file. Assume the credential was seen.
Related Guides
- How to Change the PHP Version via CloudLinux Selector in cPanel
- How to Increase or Decrease PHP Memory Limit via CloudLinux Selector in cPanel
If you cannot find the error you are looking for, or you would rather not expose error output on a live site at all, open a ticket with Noiz support. Include your domain name, the page or action that fails, and the time it last happened, and Noiz can pull the relevant entries from the server-side error log for you. On managed plans, Noiz will investigate the fault directly rather than leaving you to toggle settings.






