WHM (WebHost Manager) is the administrative layer that sits above cPanel. Creating an account in WHM is how you turn a hosting package into a live cPanel user: a username, a home directory, a DNS zone, mail routing and a set of resource limits, all provisioned in one step. This guide walks you through the Create a New Account interface, explains what each field actually does, and flags the choices that are awkward to reverse later.
It is written for anyone with WHM access: a reseller creating accounts for clients, or a server administrator creating accounts on a VPS or dedicated server.
Last reviewed: 27 July 2026, against the current stable cPanel & WHM release. This guide is written for Noiz hosting and is kept current against cPanel & WHM. It complements, and does not replace, the official cPanel documentation linked below. Field names and section order vary slightly between versions and between reseller and root logins, so treat the labels below as the current wording rather than a fixed layout.
Official Documentation Reference
- WHM: Create a New Account (full field reference)
- WHM: Add a Package
- WHM: Modify an Account
- WHM: Account Functions overview
- cPanel product versions and the release process (how to tell which version your server runs)
Prerequisites
- Login details for WHM, either the root account or a reseller account with the Create Account privilege.
- At least one hosting package. Packages define disk quota, bandwidth, the number of mailboxes and databases, and the feature list. If you have not created one yet, see How to Create/Add a Package in the WHM.
- The domain name the account will host, and somewhere safe to store the generated password (a password manager, not a text file on your desktop).
- Enough free disk space and enough remaining account slots on your reseller or server licence.
Step 1: Log in to WHM
Sign in to WHM with your root or reseller credentials. Reseller accounts see a reduced menu and can only create accounts within the limits their provider has set.
Step 2: Open Create a New Account
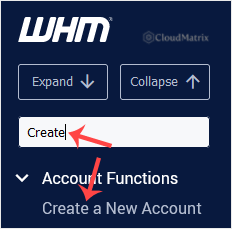
In the left sidebar, go to Account Functions >> Create a New Account. The quickest route is to type create into the menu filter box at the top of the sidebar and click the matching result.
Step 3: Fill in Domain Information
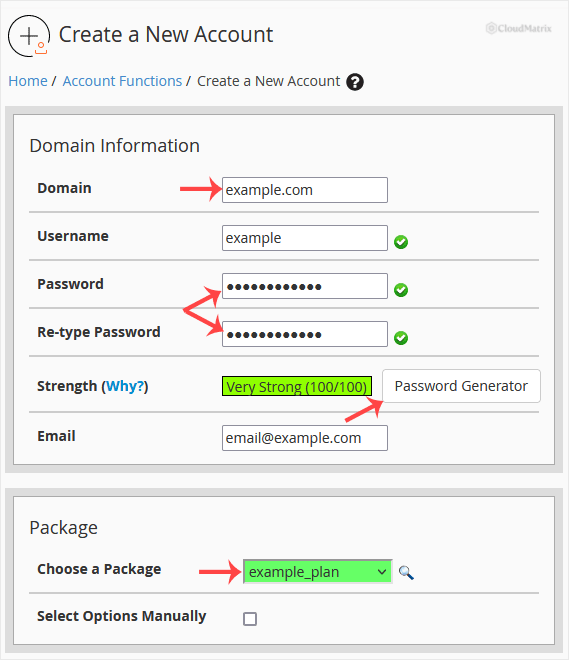
This is the only section you must complete by hand. Everything below it has a sensible default.
- Domain: The domain the account will host, for example
yourdomain.com(replace this with the real domain). Enter it withoutwww.and withouthttp://. This becomes the account's primary domain and it is the one value that is genuinely painful to change later, so check the spelling before you continue. - Username: Click into the blank field and WHM suggests a username derived from the domain. You can overwrite it. The username is permanent for the life of the account, it prefixes every database and system mailbox name, and it is the Linux user that owns the files.
- Password and Re-type Password: Use the built-in Password Generator and copy the result somewhere safe before you submit the form. WHM shows a strength meter and will refuse weak passwords if a minimum strength is enforced on the server. If the password is lost, it can be reset later from Modify an Account or from within cPanel.
- Email: A working contact address for the account holder. Do not use an address at the domain you are about to create, because the mailbox does not exist yet and account notifications would be undeliverable.
Step 4: Choose a package
Under Package, pick an existing package from the Choose a Package drop-down. The package supplies the disk quota, bandwidth allowance, mailbox and database limits, and the feature list the customer sees inside cPanel.
Selecting Select Options Manually instead reveals the Manual Resource Options section, where you can set those limits per account and optionally save the result as a new package. Manual settings are convenient once and a maintenance problem forever: an account created that way is not linked to a package, so a later change to your standard limits will not reach it. Prefer creating a package and reusing it.
Step 5: Review the Settings section
Defaults here are usually correct. The fields worth understanding are:
- Dedicated IP: Assigns the account its own IP address instead of the shared server IP. Only tick this when there is a real requirement, and only if a spare address is available. Modern SSL certificates work fine on shared IPs thanks to SNI, so a dedicated IP is rarely needed for HTTPS.
- Shell Access: Grants SSH access to the server. Leave this off for ordinary hosting accounts. If a developer needs shell access, jailed shell is the safer choice where your server offers it.
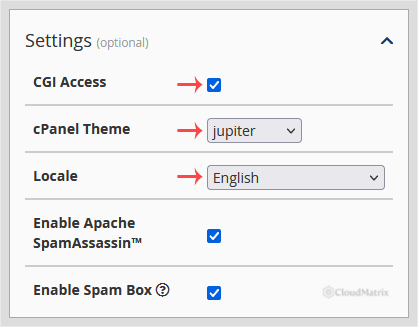
- CGI Access: Allows the account to execute CGI scripts from
cgi-bin. This option still exists in current versions and is enabled by default, but almost nothing needs it today. PHP applications run through PHP-FPM or a similar handler, not CGI. Leave it as the package sets it unless a specific legacy Perl or shell script requires it. - Digest Authentication for Web Disk: Only needed for Web Disk connections from older Windows clients over an unencrypted connection. Leave it off and use an encrypted Web Disk or WebDAV connection instead.
- cPanel Theme: Leave the default unless you deliberately provision a different interface style.
- Locale: The language the new cPanel account opens in. Set it to match the account holder rather than yourself.
Step 6: Check Mail Routing and Reseller Settings
Mail Routing Settings tells the server what to do with mail for the new domain. Automatically Detect Configuration is the correct choice in almost every case: it inspects the domain's MX records and routes accordingly. Choose Remote Mail Exchanger only when mail for the domain is deliberately hosted elsewhere, such as a third-party mail provider, otherwise the server will keep mail locally and the customer will not receive it.
Under Reseller Settings, Make the account a reseller promotes the new user so they can create accounts of their own. Leave it unticked for a normal hosting account. This option appears only when you are logged in as root or as a reseller with the relevant privilege.
Step 7: Confirm DNS Settings
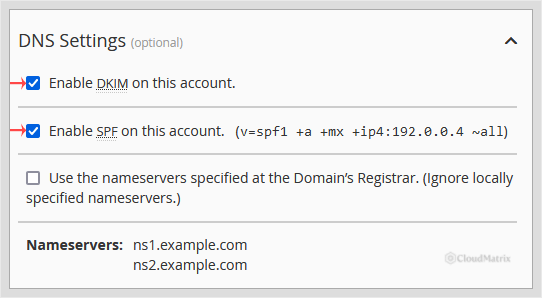
- Enable DKIM on this account: Enabled by default. Keep it enabled. DKIM signs outgoing messages so receiving servers can confirm the mail genuinely came from the domain.
- Enable SPF on this account: Keep it enabled. SPF publishes which servers are allowed to send mail for the domain, which makes spoofing harder and improves the odds that legitimate mail reaches the inbox.
- Enable DMARC on this account: Publishes a policy telling receiving servers how to treat mail that fails SPF and DKIM. Current versions add a starting record automatically.
- Use the nameservers specified at the domain's registrar: Tick this when the domain's DNS is managed somewhere other than this server. If you leave it unticked, WHM creates a local DNS zone that will simply be ignored while the registrar points elsewhere, which is a common source of confusion when records are edited in the wrong place.
DKIM, SPF and DMARC records only take effect once the domain's authoritative DNS is actually served by this server. If DNS is hosted elsewhere, copy the generated records across manually.
Step 8: Create the account
Leave any remaining options at their defaults, scroll to the bottom of the form and click Create.

WHM streams a progress log while it provisions the home directory, DNS zone, mail configuration and database user. Wait for the confirmation that the account was created successfully rather than navigating away, because errors are reported inside that log and nowhere else.
After the account is created
- Point the domain at the correct nameservers if you have not already. Domains hosted with Noiz use ns1.noiz.co.za and ns2.noiz.co.za.
- Issue an SSL certificate for the new domain. On servers with AutoSSL enabled this happens automatically once DNS resolves to the server, which can take a few hours after a nameserver change.
- Send the account holder their cPanel username and login URL, and ask them to change the password on first login.
- Resource limits, the package, the contact address and the password can all be adjusted afterwards from Account Functions >> Modify an Account. The username and the primary domain are the two values best treated as permanent.
Troubleshooting
Symptom: "This domain is already set up" or "domain already exists". The domain, or a subdomain of it, is already hosted on the server under another account. Search List Accounts for the domain and remove or rename the conflicting entry before retrying.
Symptom: The username is rejected. cPanel usernames are lowercase, start with a letter, contain only letters and digits, and are limited in length. They also cannot clash with an existing system user, so avoid names such as mail, test or admin.
Symptom: "You have reached your maximum number of accounts". A reseller limit or a licence limit has been reached. Ask your provider to raise the limit, or remove an unused account first.
Symptom: The account is created but the website shows the default page. DNS has not propagated to the new server yet, or the domain still points at the old nameservers. Confirm the domain resolves to the correct IP address before assuming the account is at fault.
Symptom: Mail is accepted by the server but the customer never receives it. Mail routing is set to local while the MX records point elsewhere, or the reverse. Correct the routing in Edit MX Entry for that domain.
Symptom: The customer needs their account taken offline rather than deleted. Suspend it instead of removing it, which preserves the files and settings. See How to Suspend a cPanel User in the WHM Account.
Need a hand?
If you are unsure which control panel your Noiz plan uses, or an account will not provision, open a support ticket from the Noiz client area with the domain name and the exact error text from the WHM log. Noiz support can check server-side limits, DNS and licensing on your behalf.






