A plugin has started misbehaving, an update stopped halfway, or a file inside the plugin folder has been edited or corrupted. In cases like these you want a force reinstall: replace the plugin's files with a clean copy from the source, while leaving the plugin's settings and content in place.
This guide shows you four ways to do that on your Noiz-hosted WordPress site, ordered from safest to riskiest. It covers both active and inactive plugins.
Last reviewed: 27 July 2026, against WordPress 7.0.2 (latest stable). This guide is written for Noiz hosting and is kept current against WordPress. It complements, and does not replace, the official WordPress documentation linked below.
Official Documentation Reference
- Manage Plugins (WordPress.org documentation)
- Plugin File Editor Screen (Advanced Administration Handbook)
- Editing Files (Advanced Administration Handbook)
- wp plugin install and wp plugin update (WP-CLI command reference)
Prerequisites
- Administrator access to the WordPress dashboard.
- A current backup of the site files and database. Take one before you start, whichever method you choose.
- The plugin's slug (the folder name, for example
hello-dolly) if you plan to use WP-CLI. - SSH access to your hosting account, for the WP-CLI method only.
What a Force Reinstall Does and Does Not Do
Understanding this saves a lot of wasted effort.
- Plugin files live in
wp-content/plugins/plugin-slug/. A reinstall replaces these. - Plugin data (settings, licence keys, form entries, product catalogues, order history) lives in the database, in the
wp_optionstable or in the plugin's own tables. A reinstall does not touch any of it. - Activation state is also stored in the database. Overwriting the files does not deactivate an active plugin.
So a force reinstall fixes corrupted, missing or hand-edited plugin files. It will not fix a problem caused by bad data in the database, a conflict with another plugin, a theme conflict, or a PHP version mismatch. If a clean set of files does not resolve the fault, the cause lies elsewhere.
A force reinstall also wipes any customisations you made directly to the plugin's files, which is usually the point, but is worth noting if someone before you patched the plugin by hand.
Method 1: WP-CLI (Recommended)
This is the cleanest and safest option. It downloads a fresh copy and overwrites the plugin folder in one step, with no editing of live files and no risk of the plugin's uninstall routine firing.
Connect over SSH and change into the directory containing wp-config.php, then confirm which version is installed:
wp plugin get hello-dolly --field=versionReinstall the same version cleanly:
wp plugin install hello-dolly --forceThe --force flag tells WP-CLI to overwrite the installed copy without prompting. Replace hello-dolly with your plugin's slug.
To reinstall a specific older version instead, name it:
wp plugin install hello-dolly --version=1.7.1 --forceOr move an installed plugin to a chosen version:
wp plugin update hello-dolly --version=1.7.1An active plugin stays active throughout, because activation is recorded in the database rather than in the files.
Gotcha: these commands pull from the WordPress.org plugin repository. A premium or privately distributed plugin is not there, so WP-CLI cannot fetch it by slug. For those, install from the vendor's ZIP file instead:
wp plugin install /home/youruser/premium-plugin.zip --forceMethod 2: A Rollback Plugin (No Command Line)
If you do not have shell access, or you specifically want to step a plugin back to an earlier version from the dashboard, install a rollback utility such as WP Rollback from the WordPress.org repository. It adds a Rollback link beside each plugin on the Plugins screen and lets you pick any version the repository still hosts.
Reinstalling the current version through a rollback tool also works as a repair: it replaces the files with a clean copy.
Gotcha: rollback tools read from the WordPress.org repository, so they only list versions for plugins hosted there. Remove the rollback utility once you are finished, since it is a maintenance tool rather than something a production site needs running permanently.
Method 3: Deactivate, Delete and Reinstall
The obvious route, and it works, but read the warning first.
- Go to Plugins and click Deactivate on the plugin.
- Click Delete, then confirm.
- Go to Plugins and then Add Plugin, search for the plugin, and click Install Now, or use Upload Plugin if you have the ZIP file.
- Click Activate.
Warning: deleting a plugin is not the same as deactivating it. When WordPress deletes a plugin it runs that plugin's uninstall routine, and a well-behaved plugin uses that routine to clean up after itself. Some plugins deliberately drop their own database tables and options at that point. Deactivation is always safe; deletion is not guaranteed to be. If losing the plugin's settings would hurt, use Method 1 or Method 2 instead, and make sure your backup is current.
Also bear in mind that deactivating a page builder, security plugin or caching plugin, even briefly, can change how the live site renders while you work. Do this during a quiet period.
Method 4: Force an Update by Editing the Version Number (Last Resort)
This is the classic trick: lower the version number in the plugin's main file so WordPress believes an update is available, then run that update. WordPress downloads a fresh copy from the repository and overwrites the folder.
It still works, but it is the riskiest method on this page, because you are editing a live PHP file on a running site with no backup taken by the editor. Use it only when the methods above are not available to you.
Before you start, note these limits:
- It only works for plugins distributed through the WordPress.org repository. Premium plugins using their own update servers will either show no update or fail a licence check.
- The Plugin File Editor may not appear at all. Many hosting setups and security plugins set
DISALLOW_FILE_EDITinwp-config.php, which removes the file editors from the admin menu by design. - Since WordPress 5.2, saving a PHP file through the editor triggers loopback requests to the admin screen and the homepage, and the change is rolled back automatically if a fatal error is detected. Treat that as a safety net, not a guarantee: it does not catch breakage that stops short of a fatal error.
Step 1: Open the Plugin File Editor
Log in to the WordPress dashboard, then go to Plugins and click Plugin File Editor.
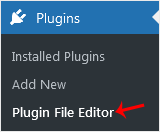
Where is it? The location depends on your theme. On a classic theme the Plugin File Editor sits under Plugins. On a block theme, WordPress moves both file editors to Tools, so look for Tools and then Plugin File Editor.
Step 2: Select the Plugin
From the Select plugin to edit drop-down, choose the plugin and click Select.
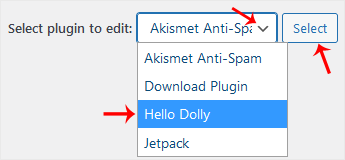
The editor opens the plugin's main file by default, which is the file carrying the plugin header comment. That is the file you need. Do not open a file from an includes or assets folder.
Step 3: Lower the Version Number
Near the top of the file, inside the header comment block, find the version line:
Version: 1.7.2Change it to a lower number, for example:
Version: 1.7.1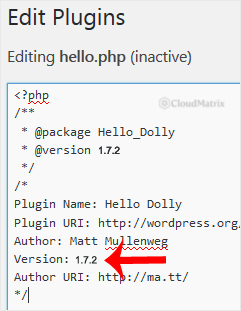
Change the version downwards only, and change nothing else on the line or anywhere else in the file. Keep the format valid, such as 1.7.1. Do not set it to 0, leave it blank, or delete the line: a missing or malformed version header confuses the updater and some plugins read their own version at runtime.
Step 4: Save and Run the Update
Scroll down and click Update File. Then return to the Installed Plugins list. An update should now be offered for the plugin you edited. Click Update now.
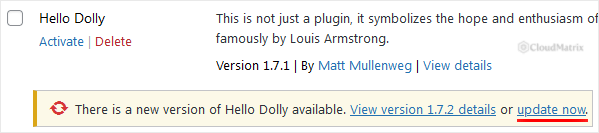
WordPress puts the site into maintenance mode for a few seconds, downloads the current release, and replaces the plugin folder. When it finishes, confirm on the Installed Plugins screen that the version number has returned to the real current release. The plugin's settings and data are exactly as they were.
If no update appears: WordPress caches update information for up to twelve hours. Go to Dashboard and then Updates, and click Check again to force a fresh lookup, then revisit the Plugins screen.
Troubleshooting
Symptom: There is no Plugin File Editor item anywhere in the menu. The file editors have been disabled through DISALLOW_FILE_EDIT in wp-config.php, or by a security plugin. This is a sensible hardening measure and is best left in place. Use Method 1 or Method 2 instead.
Symptom: Saving the file returns an error saying the change was reverted because it would cause a fatal error. You edited the wrong file, or the edit broke PHP syntax. Only the version number on the Version: line should have changed. Reopen the plugin's main file and try again.
Symptom: No update is offered after lowering the version. Force an update check from Dashboard and then Updates. If it still does not appear, the plugin is almost certainly not hosted on WordPress.org, so use the vendor's ZIP file with Method 1 or Method 3.
Symptom: The update fails with a permissions or "could not create directory" error. The plugin directory is not writable by the web user. Contact Noiz support and quote the exact error, and the file ownership will be corrected for you.
Symptom: The site shows a blank page or a critical error after the edit. Restore access by disabling the plugin outside the dashboard: rename its folder under wp-content/plugins/ using SFTP or your control panel's file manager, which deactivates it immediately, or run wp plugin deactivate plugin-slug over SSH. Then reinstall it cleanly with Method 1.
Symptom: The plugin was reinstalled successfully but the original fault is still there. The problem is not in the plugin's files. Test by deactivating all other plugins and switching to a default theme, then reactivating one at a time to find the conflict, or check the plugin's own settings and database records.
Getting Help
If the plugin is central to a live site and you would rather not experiment on it, Noiz support can take a restore point, run the reinstall through WP-CLI, and confirm the result for you. Open a ticket from the Noiz client area with your domain name, the plugin name, and a short description of what the plugin is doing wrong.






