Not every plugin lives in the WordPress.org plugin directory. Premium plugins bought from a developer, plugins built for you by an agency, beta builds, and older versions you need to roll back to all arrive the same way: as a .zip file. This guide covers installing one of those on a WordPress site hosted with Noiz, by uploading the zip through the WordPress dashboard.
If the plugin you want is in the public directory, you do not need any of this. Search for it and install it in two clicks instead, as described in How to Install a WordPress Plugin. Come back here when there is nothing to search for, only a file you have downloaded.
Last reviewed: 27 July 2026, against WordPress 7.0.2 (latest stable). This guide is written for Noiz hosting and is kept current against WordPress. It complements, and does not replace, the official WordPress documentation linked below.
Official Documentation Reference
- Manage Plugins, manual plugin installation, the upstream reference for the screens shown here
- Managing Plugins, advanced administration, covering the filesystem layout and the
wp-content/pluginsdirectory - Common WordPress Errors, for the upload and memory errors referenced in Troubleshooting
Prerequisites
- A WordPress site on your Noiz hosting account, and an administrator login to its dashboard.
- The plugin's
.zipfile already downloaded to your computer. Do not unzip it. - A current backup, or at least the confidence that you can restore one. Any plugin can take a site down on activation.
Before You Upload: Check the Zip
Most failed manual installs fail because of the archive, not because of WordPress. Two quick checks save a lot of guesswork.
The plugin folder must sit at the root of the zip. Open the file and you should see a single folder, for example my-plugin/, containing a PHP file with the plugin header inside it. If instead you see my-plugin/my-plugin/, or the PHP files sitting loose at the top level, WordPress will either reject the archive or install something that never appears in the plugins list.
Do not re-zip a folder unless you have to. Upload the file exactly as the developer supplied it. Compressing a folder yourself, particularly on macOS, adds a __MACOSX directory and .DS_Store files, and it is easy to end up with the nesting problem above. If you did unzip it to look inside, download a fresh copy rather than re-compressing.
Archives pulled from a GitHub repository using Download ZIP deserve a note of their own. They unpack to a folder named after the branch, such as my-plugin-main, which means WordPress treats each new download as a separate plugin rather than an update to the last one. Prefer the developer's official release zip where one exists.
Step 1: Open the Add Plugins Screen
- Log in to your WordPress dashboard at
yourdomain.com/wp-admin, replacingyourdomain.comwith your own domain. - In the left-hand menu, hover Plugins and click Add New Plugin.
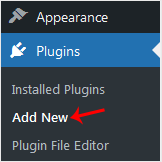
On WordPress 6.3 and earlier this menu item was simply Add New, which is what the screenshot above shows. It was renamed to Add New Plugin in WordPress 6.4 to make it clearer at a glance. Either label takes you to the same Add Plugins screen, and everything that follows is unchanged.
Step 2: Upload the Zip File
- Click Upload Plugin, the button at the top of the screen beside the Add Plugins heading.
- Click Choose File, labelled Browse in older versions and in some browsers, then select the plugin's
.zipfile. - Click Install Now.
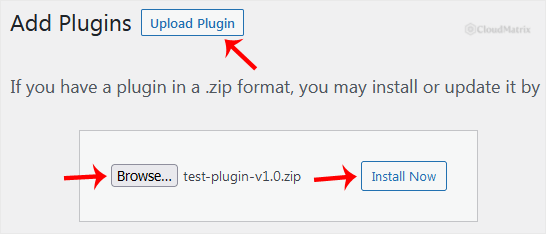
WordPress uploads the archive, unpacks it into wp-content/plugins, and reports progress line by line. A successful run ends with Plugin installed successfully.
If the plugin is already installed, WordPress does not silently overwrite it. Since version 5.5 it shows a comparison of the current and uploaded versions, then offers Replace current with uploaded. That is the supported way to apply a manual update or to roll back to an earlier build, and it is safer than deleting the plugin first, because deleting a plugin can also remove its stored data.
Step 3: Activate the Plugin
Installing only puts the files in place. The plugin does nothing until you switch it on.
- Click Activate Plugin on the results screen.
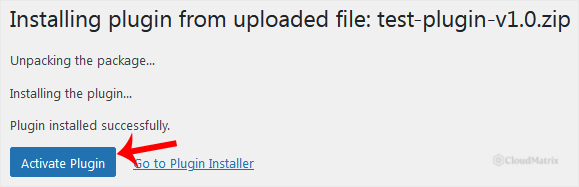
If you navigated away before activating, the plugin is still installed. Go to Plugins in the sidebar, find it in the list, and click Activate underneath its name.
After activation, most plugins add themselves to the dashboard. Look for a new top-level item in the left-hand menu, or a new entry under Settings, Tools or Appearance. Some also show a setup wizard or a prompt to enter a licence key. Premium plugins usually will not receive updates until that key is entered, so do it now rather than discovering months later that the plugin has been frozen at the version you uploaded.
On a Multisite Network
Plugins are uploaded from the Network Admin dashboard, not from an individual site. After installing, you choose either Network Activate, which turns the plugin on everywhere, or leave it inactive and let individual site administrators activate it themselves, if the network settings permit that.
The Security Part, Read This Once
Uploading a zip bypasses every check that the WordPress.org directory applies. A plugin runs with the same privileges as WordPress itself, which means it can read your database, write files, and send mail from your domain. There is no sandbox.
Install only from the developer who wrote the plugin, or from a marketplace you have an account with. Be particularly wary of "nulled", "free premium" or "GPL club" copies of commercial plugins. Backdoors in those are common, and the cost of cleaning up a compromised site is far higher than the licence you avoided paying for.
Two habits worth keeping: check when the plugin was last updated before you trust it with a live site, and remove plugins you have stopped using rather than leaving them deactivated, since the code is still on disk either way.
Alternative: Upload Over SFTP or File Manager
If the dashboard upload will not work, for example because the file is too large or the site is already in a broken state, you can place the plugin directly on the server.
- Unzip the plugin on your computer, so you have a folder such as
my-plugin. - Connect to your Noiz hosting account with SFTP, or open the File Manager in your control panel.
- Navigate to the WordPress installation, then into
wp-content/plugins. - Upload the whole folder into that directory.
- Back in the WordPress dashboard, go to Plugins. The plugin now appears in the list. Click Activate.
Upload the folder, not the zip. WordPress does not unpack archives it finds on disk. If you prefer, upload the zip using File Manager and use its own extract function in place, then delete the archive afterwards.
Troubleshooting
Symptom: "The uploaded file exceeds the upload_max_filesize directive in php.ini". The plugin zip is larger than the PHP upload limit for that site. Raise upload_max_filesize and post_max_size in the PHP settings for the domain in your Noiz control panel, setting post_max_size at least as high as upload_max_filesize, then retry. If you would rather not change the limits, use the SFTP method above instead.
Symptom: "The link you followed has expired". Despite the wording, this is almost always the same size limit, hit as the upload exceeds post_max_size or max_execution_time. Treat it exactly as the error above.
Symptom: "Destination folder already exists". A plugin with that folder name is already installed. Use the Replace current with uploaded option WordPress offers, or deactivate and delete the existing copy first if you genuinely want a clean install, accepting that its settings may go with it.
Symptom: "The package could not be installed. No valid plugins were found." The archive structure is wrong, or the main PHP file is missing its plugin header. Re-check the zip against the guidance at the top of this article, and confirm you downloaded the plugin itself rather than a documentation bundle or a full product package that contains the plugin zip inside it.
Symptom: WordPress asks for FTP connection details before installing. WordPress could not write to the plugins directory as the web server user, so it falls back to asking for credentials. On Noiz hosting this normally indicates ownership or permission drift on wp-content, often after a manual file restore. Open a ticket rather than entering credentials into the prompt, and Noiz will correct the ownership.
Symptom: white screen or a fatal error immediately after activating. The plugin is incompatible with your PHP or WordPress version, or it conflicts with something already installed. Rename the plugin's folder in wp-content/plugins over SFTP or File Manager, for example to my-plugin-off. WordPress deactivates any plugin whose folder it cannot find, and the site comes straight back. Then check the plugin's stated PHP and WordPress requirements before trying again.
Symptom: the plugin installs but never appears in the Plugins list. It has been unpacked one level too deep, giving wp-content/plugins/my-plugin/my-plugin/. Move the inner folder up a level over SFTP so the PHP files sit one directory below plugins, then refresh the Plugins screen.
Need a Hand
If an upload keeps failing, or a plugin activation has taken the site down and you would rather not go digging through the filesystem, open a ticket in the Noiz client area. Include the site's domain, the plugin name and version, and the exact error text WordPress showed. On managed plans Noiz will install the plugin, confirm it activates cleanly, and restore from backup first if the site is already down.






