You cannot stop spam reaching your mailbox entirely, but you can decide what happens to it once it arrives. A user-level email filter in cPanel inspects each incoming message for a single mailbox and then acts on it automatically: sort it into a folder, redirect it, or discard it. This guide shows you how to create one.
A user-level filter applies to one email account only (for example [email protected]). If you want a rule that applies to every mailbox on the cPanel account at once, you want a global (account-level) filter instead, which lives under Global Email Filters.
Last reviewed: 27 July 2026, against the current cPanel & WHM stable release. This guide is written for Noiz hosting and is kept current against cPanel. It complements, and does not replace, the official cPanel documentation linked below.
Official Documentation Reference
- cPanel & WHM Documentation: Email Filters (per mailbox)
- cPanel & WHM Documentation: Global Email Filters (whole account)
Prerequisites
- Access to your cPanel account. Your Noiz welcome email contains your cPanel sign-in URL and credentials.
- At least one email account already created in cPanel, since a user-level filter is attached to a specific mailbox.
Create the Filter
- Log in to your cPanel account.
- In the Email section, click Email Filters.
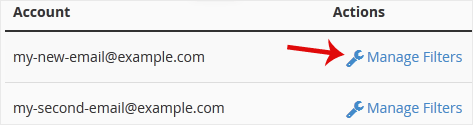
- Under Filters by Users, you will see every email account on the cPanel account. Click Manage Filters next to the mailbox you want the filter to apply to.
- Click Create a New Filter.
- Enter a descriptive name in the Filter Name box. The name must be unique for that mailbox, and a clear name (for example
Discard lottery spam) makes the filter easy to find and edit later. - Build the rule. In the first list box, choose the part of the message to test, and in the second list box choose how to test it. To catch a message that contains a word such as Lottery anywhere in its text, select Body in the first list box and contains in the second, then type
Lotteryin the value box. - From the Actions menu, choose what should happen to a matching message. For example, select Discard Message to delete it silently.
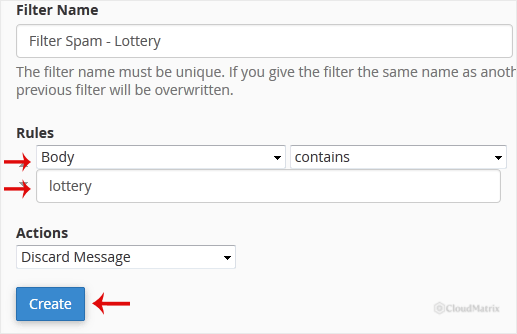
- Click Create.
Choosing the Right Action
The action decides the message's fate, so choose it deliberately:
- Discard Message deletes the message permanently and silently. There is no copy kept and no bounce sent to the sender, so a genuine message caught by a slightly too broad rule is gone for good. Use it only when you are confident the rule is precise.
- Deliver to folder is the safer choice for suspected spam. The message is filed into a folder (for example a
JunkorFilteredfolder) where you can review it before deleting, rather than losing it outright. - Redirect to email forwards a matching message to another address.
- Fail with message rejects the message at delivery and returns your text to the sender.
- Stop Processing Rules halts any further filters for that message, which is useful when you want one rule to take precedence over the rest.
You can add more than one rule to a single filter with the + button and join them with and or or, so a filter can require several conditions to match before it acts.
Test the Filter Before You Rely on It
The Email Filters page includes a Filter Test box. Paste a sample message (headers and body) into it and click Test Filter to see exactly which rules match and what action would run, without waiting for real mail to arrive. Testing first is the quickest way to confirm a Discard Message rule is not wider than you intended.
Manage Existing Filters
Every filter you create for a mailbox is listed on the same Manage Filters screen for that account. From there you can drag filters to reorder them (they run top to bottom), click Edit to change a rule or action, or click Delete to remove a filter you no longer need. Because filters run in order, placing a Stop Processing Rules action correctly lets you control which rule wins when two could match the same message.
Troubleshooting
- The filter is not catching messages you expected: check that you selected the correct message part (a keyword in the visible text is in the Body, while a sender address is in From), and that the value has no stray spaces. Use the Filter Test box to confirm.
- Wanted mail is disappearing: a Discard Message rule is almost certainly too broad. Edit the filter, switch the action to Deliver to folder, and narrow the condition until only unwanted mail matches.
- The filter does not appear for other mailboxes: this is expected. A user-level filter only applies to the single account you created it under. Create a Global Email Filter if you need the same rule across every mailbox on the account.
If you are on a Noiz managed plan and would like help designing a filter, or you are unsure whether a user-level or global filter is the right fit, open a support ticket and the Noiz team will assist.






