An FTP account's quota sets the maximum amount of disk space that account is allowed to use inside its home directory. This guide shows you how to change that quota, or remove the limit entirely, from within cPanel. You will need your cPanel login details to begin.
Last reviewed: 27 July 2026, against the current stable release of cPanel & WHM. This guide is written for Noiz hosting and is kept current against cPanel. It complements, and does not replace, the official cPanel documentation linked below.
Official Documentation Reference
Prerequisites
- Access to your cPanel account.
- At least one FTP account already created.
Change the FTP Quota
- Log in to your cPanel account.
- In the Files section, click FTP Accounts.

- Under the FTP Accounts list, find the account you want to adjust and click Change Quota.
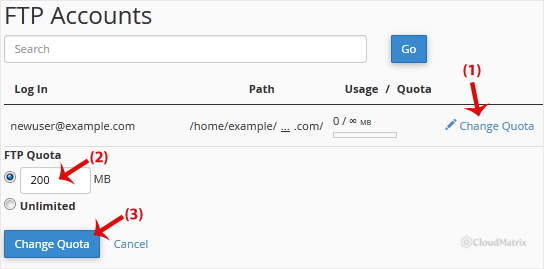
- Set the FTP Quota: enter the limit as a number in megabytes (for example, type
500for a 500 MB limit), or select Unlimited to remove the limit. - Click Change Quota to save your choice.
Good to Know
- The quota is measured in megabytes (MB), so enter a plain number such as
250or1000. Setting the value to Unlimited lets the account use as much space as your overall hosting package allows. - An FTP quota never grants more space than your hosting plan provides. It only caps how much of that space a single FTP account may fill, which is useful when you hand out an account to a third party and want to keep their usage in check.
- The main FTP account tied to your primary cPanel login shares your account's total disk space and does not take a separate quota here. The Change Quota option applies to the additional FTP accounts you create.
If you are on a managed Noiz plan and would prefer the quota adjusted for you, contact Noiz support and the team will take care of it.






