When you are away on holiday, off sick, or simply unavailable for a while, an email autoresponder replies to anyone who writes to you with a message you set in advance. The sender is told when to expect a reply, or who to contact in the meantime, and your normal mail still lands in your inbox as usual. This guide shows you how to create and later remove an autoresponder on a Noiz cPanel hosting account.
Last reviewed: 27 July 2026, against cPanel & WHM (current stable release, Jupiter theme). This guide is written for Noiz cPanel hosting and is kept current against cPanel. It complements, and does not replace, the official cPanel documentation linked below.
Official Documentation Reference
Prerequisites
- A Noiz cPanel hosting account that you can sign in to.
- The email account you want to auto-reply from already created on that domain (for example
[email protected]).
Create an Autoresponder
- Sign in to your cPanel account.
- In the Email section, click Autoresponders.

- On the Autoresponders page, click Add Autoresponder.
- Complete the form:
- Character Set: Leave this as
utf-8unless you have a specific reason to change it.utf-8handles accented and non-English characters correctly. - Interval: The number of hours cPanel waits before it replies to the same sender again. A sender who writes to you three times within the interval receives only one auto-reply. Set this to a sensible value such as
24. Avoid0, which replies to every single message and can create a mail loop if the other side is also running an autoresponder. - Email: The local part of the address you are enabling the autoresponder on. To reply from
[email protected], enter support here. - Domain: Select the correct domain from the drop-down list if the account holds more than one.
- From: The name that the auto-reply appears to come from, for example your own name or your team name.
- Subject: The subject line of the auto-reply, for example
Out of office until 5 August. - This message contains HTML: Tick this box only if you have written the body in HTML. Leave it clear for plain text.
- Body: The message senders receive. Keep it short and tell people when you will be back and who to contact for anything urgent.
- Character Set: Leave this as
Inside the Subject and Body fields you can insert the tags %subject%, %from% and %email%. cPanel replaces these with the original message's subject, the sender's name and the sender's address, so you can personalise each reply.
- Under Start, choose Immediately to begin now, or Custom to pick a date and time. Under Stop, choose Custom and set the date your holiday ends. Leaving it on Never means the autoresponder keeps replying until you delete it by hand.
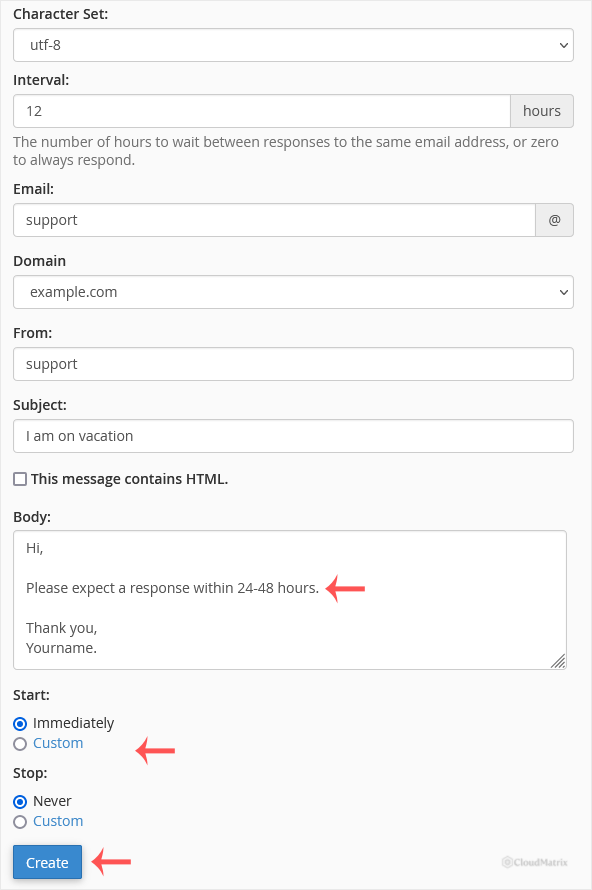
- Click Create. cPanel confirms the autoresponder and it appears under Current Autoresponders.
Remove an Autoresponder
- In the Email section, click Autoresponders.
- Find the address under Current Autoresponders.
- Click Delete to the right of that address.
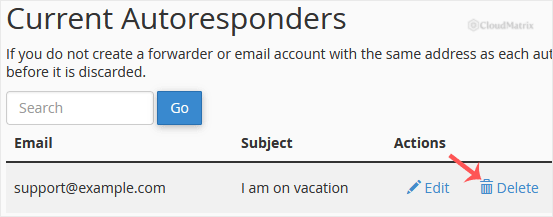
- Confirm with Delete Autoresponder.
Good to Know
- An autoresponder does not hold, block, or filter your incoming mail. Every message still arrives in your inbox as normal; the auto-reply is simply sent in addition.
- If you set a Stop date, remember it is the moment replies stop. Set it to when you are actually back at your desk, not the day you leave.
- Only messages that arrive while the autoresponder is active receive a reply. Mail that arrived before you enabled it is not answered retrospectively.
Need a Hand?
If your autoresponder is not sending as expected, or you would like Noiz to set one up for you, open a support ticket from your Noiz client area and the team will assist.






